
Mounting models on scenic bases

While writing a MAS resin base review a while ago, I realized there are people who’d love to use these beautiful bases (regardless of producer), but could use a hand in mounting their models to them. Well, I had exactly the same problem when I started.
So – a guide for those who need one 🙂 in a few easy steps.

The toolbox
- Hobby knife
- Needle file
- Hobby drill with appropriate bits (I use a 2mm and 3,2mm).
- Side-cutting pincers (or a dremel tool).
- Superglue (preferably a gel variety).
- Bright paint (optional).
- Rare-earth magnets (optional).
- Pinning wire (optional). I find paper clips to be an excellent source of this.
Step One
Pick your base. Many of the scenic bases have numerous objects depicted on them, and Infinity models are known for their dynamic posing – it might be difficult to fit some of them on some of the bases.
Take your time here.

Step Two
Clip the tab on your model into pegs under the model’s feet. While one is enough, I tend to use as many as there are feet touching the ground.
Doing it with a hobby knife alone is tricky and requires a lot of effort. Side-cutting pincers make it way easier. However, be careful – I’m yet to bust a model’s leg with these, but I’ve been warned that it is pretty easy (also, cutting with pincers makes the leg bend outward). Therefore some folks prefer a dremel or a similar power tool for this task.
The pegs should be similar in size to the diameter of the drill you intend to use – once the major cut is done, trim them down to required size with a hobby knife or file.
Some folks prefer to remove the tab completely and pin the model’s feet. It allows for use of steel or brass wire for pinning, and making a much smaller, less visible hole in the base. I personally use this technique for models that come without tabs – like TAG or most REMs – normal, human-sized ones I don’t consider to be worth the trouble. Especially given the tiny feet of many Infinity models.

Step Three
Mark the peg hole positions on your base. While I usually just press the pegs onto the base’s surface or scratch with them, you might want to use a more professional method – dip the ends of the pegs in some bright-coloured paint, and press them against the base. It should leave nice, bright spots that will tell you where to drill your first peg hole.
Now, take the right bit and drill a hole. One hole. It is also way easier, of course, to do it if the base itself is laying flat on your workbench. Not too deep (while a hole through the base won’t be visible from the outside, it is not a good practice) – you might want pause to check the depth against your peg often.
Once the first hole is done, re-check the positioning of the other one. While small corrections can be made by bending a model’s legs a bit (careful with that!), it is better to prevent them from becoming necessary.
Drill the other hole.

Keep in mind – you’re dealing with resin. Fine dust created when filing it is not good for your health (which is one of the reasons why I use a hand drill for the job – it turns very slowly and doesn’t get much chance to generate dust).
In case you weren’t using resin scenic bases, but laser-cut MDF/HDF bases or base toppers – no, the fine stuff from these ain’t noticeably healthier.
Step Four (optional)
If you want to magnetize your bases, now’s the time. I found it way easier to transport my models around in a metal box – I can pack them tighter than in a foam tray, they don’t move even a tiniest bit, and, as result, the paint doesn’t wear out due to the abrasive surface of the foam.

I use 2mm tall, 3mm diameter rare earths magnets. 4 are more than enough to secure a human-sized models. REM-sized models I equip with 5 of these, and TAGs… well, as many as I see reasonable (TAGs are large and with a high-placed center of gravity) – my Iguana has about 20, though Geckos do with 9 or so.
- So – flip the base, and choose locations for your magnet holes. Not too close to each other, and not where the peg holes are on the other side (that would pretty easily result in a hole through the base!). I tend to place one hole centrally, and three close to the rim.
If the base has an uneven surface (due to scenic elements depicted on it), you will have a difficult time with this. So keep it easy.
Once the holes are ready, glue your magnets it. Keep the same polarization for all of them in the same base, and start with placing the central one first, the most outward one last (otherwise they’ll tend to get together when you move a new one over these already in place). Try to keep the magnets as flush with the bottom of the base as possible (it allows for maximum grip strength for the magnets).

Step Five
Glue your model in. You may want to paint the base and the model separately before that, so you’ll have unobstructed access to details.
Also, you might want to use modeling putty of one brand or another to fill the gaps and hide the pegs.

Bang, we’re done!


I pin all my Morat. It’s easy with those big stompy boots of theirs.
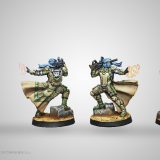
What is that model?
I can’t identify it & it’s driving me nuts.
Looks to be the Muyib LGL, from the boxed set.scrap that. It’s the Ragik from the starter set or the blister.Confirming – yes, it is the Ragik. Actually the one from the Hassassin Starter set, i.e. HMG body with Rifleman’s arms.
Hey there, what sort of base was used in the image? I can’t find it anywhere but I think it looks great!
Thank you!
It is a Micro Art Studio 25mm Ancient-series base.