
Errhile’s DIY Terrain – Cardbuilding #3

Time to build houses!
In the previous article I made some walls. But you can’t fill a table with walls… Well, okay, you can, but it would make for a dull table nine times out of ten. If you want an urban (or semi-urban) board, you want buildings.
Let’s make some!

Oh, but wait. Before we plunge into cuttin’n’gluin’, we should give our buildings a bit of thought.
First, the function. I have a rather limited amount of space I could use for storing my Infinity terrain, so I need to design my stuff for maximum effective space usage. Last time I made the walls, and they don’t exactly fit into the Objective Room building I have made with the first article in the series.
Requirement one: to be able to contain the walls. Check.
Then, I want them to be modular. Which, in this context, means stackable. I want to be able to build a multi-story city block off these. Or several one-level buildings. Therefore – I need to build that stuff as separate floors,and keep in mind the fact they have to be able to work in both capacities.
Requirement two: separate floors, check.
I recently got a MAS War Gaming Mat, which has provisions for their District 5 -series buildings. I do not own any District 5 buildings, and those cardbuilds I have are too big for that. Which means I need some 8×4” ones. Good, it should be a handy size. Pretty small if you compare it to RL buildings, but then again – 30mm scale wargaming tends to do weird things to terrain. And not necessarily make it realistic.
We have to bear with it.
Requirement three: 8×4” footprint, check. For the other dimension, I’ll go for 6cm tall – this allows me for 50mm tall door frames, with 1 cm of wall above these. Enough to make it sturdy yet fit any normal-sized model.
Now, the multi-story approach brings me to another problem: there should be communication between the floors. Also, shall I want to use a floor on ground level, there should be an entrance – but if I use it on a different level, a door frame opening into air will be looking odd (yeah, I know, there are full-height windows too)…
There should be a roof access, too, and despite the buildings being rather small – more than one way to access the upper floors, otherwise it becomes all too easy to block / mine a bottleneck and turn the building into a blockhouse. A dull game does often result from that, I’ve learned it on my own back.
Well, there are just a few ways to move between floors:
- Elevators. Which are fine, but difficult to justify in tiny, two-storey buildings. A little better in three storeys.. and completely nonsense in a ground-floor-only one. Plus they don’t do too well as roof access. Not to mention we don’t have much in way of game rules for using them.
- Ladders. These make a fine emergency access – like fire escape. Or roof entry, as it is (under normal circumstances) rarely used. However, it won’t work as primary method of moving between floors.
- Stairs. Stairs do fine, but they tend to be tiresome to construct, and they tend to take a lot of space inside of a building. Also, require you to cut holes in every floor and ceiling. But primarily – the problem is fitting them in. However, sometimes there are external staircases used. and this sounds just like what we need – it doesn’t need space inside, and doesn’t have to be attached to a building permanently. Just a module we will use, shall we need extra floors. This, of course, means another problem: each external staircase will need to be made for a given height. However, my experience says I do use buildings taller than 3 levels (ground floor, 1st floor, rooftop) on extremely rare occasions.
- Ramps. While they allow wheeled vehicles to access different floors, they can’t be steep – realistically, it would make them hard to traverse, game-wise, it would make them difficult to keep a model on without toppling over. Which implies they need to be very long to keep from being steep.
So, for my buildings I choose external stairs supplemented with ladders.
Ok, three, two, one, let’s jam!
I’m kinda running out of cardboard after the Objective Room and the Walls, so I decided to use what I have for now. I sketched it down – and while doing it, I noticed I should stick to metric measurements. The reason is very simple – I don’t have a ruler scaled in inches, and tape measure isn’t the right tool here.
Bang, rescaled from 8×4 to 20x10cm. Close enough.
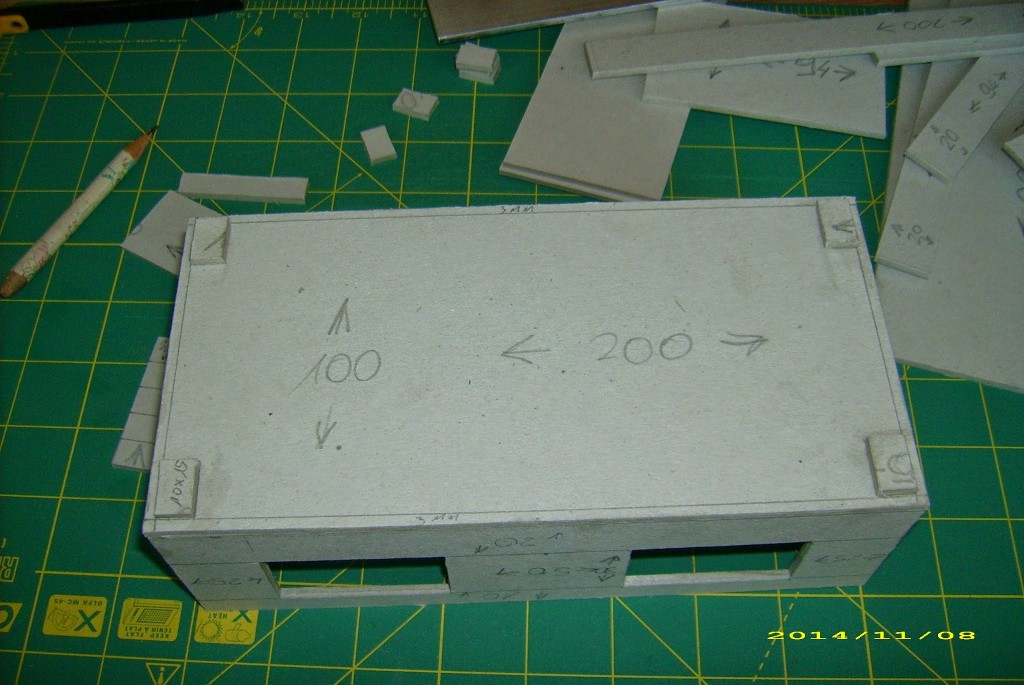
I will need a 200mm x 100mm floorplate (same size for roof plate), two 60mm tall, 200mm long side walls and two 60mm tall, 94mm wide end walls per floor.

The roof will take the same floorplate, but also 20mm tall side plates (two 200mm, two 94mm). Why 94mm? That’s actually pretty simple: the long side walls are full length, so the short ones have to be shorter by the thickness of the material. Which is 3mm – times two, that’s 6mm less than 100mm. Thus 94mm 🙂

Right, since we are here, we should mark the places for our ladders:


Side railings will be 3mm wide, and the steps themselves 19mm wide and 3mm tall. Which gives us a 25mm wide ladder – as wide as a model’s base. I don’t intend to make a ladder that could actually act as vertical slots for the bases (I’ve seen such designs!) as they would have to be suited to a particular thickness of a base. Which would be pointless if everyone in my local meta uses different base type – I use, like, 5 styles of MAS resin bases myself!
Right. Time to carve some doors and windows.
The standard for doors is set – 30mm wide, 50mm tall. I guess windows should then be 30mm tall (with 20mm wall below them), and making them larger than 50-60mm wide would not be a good idea.
A short wall with its window – just next to the ladder, so it will make for a beliveable access way inside.
Front wall, with door on the left and two windows.

Rear wall, with two windows. A little uninspired, I admit… these 50mm wide windows are pretty large.

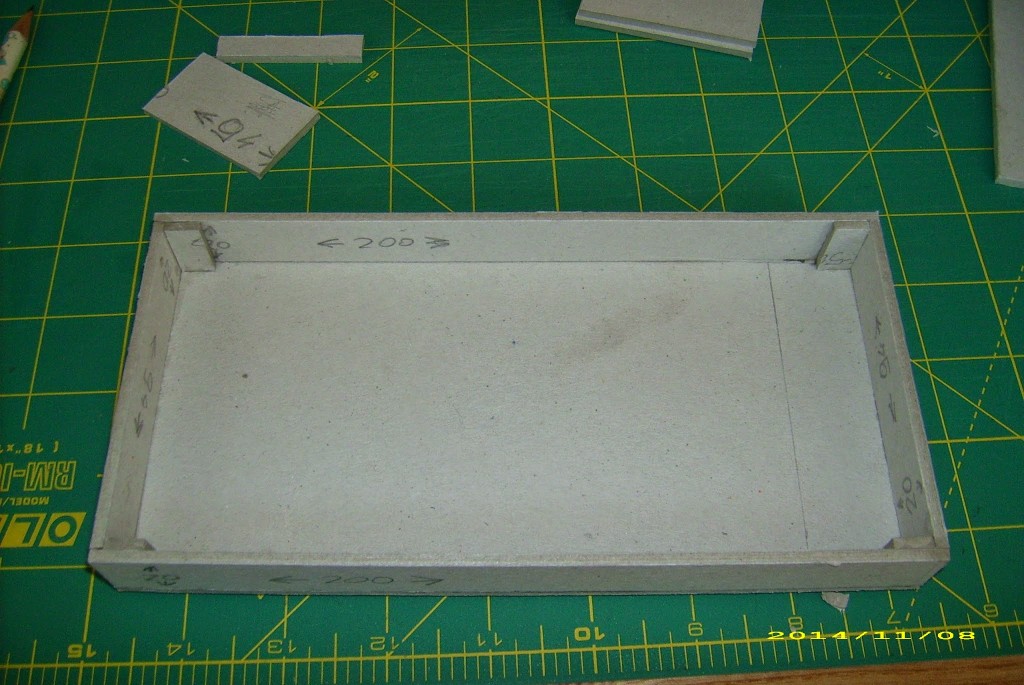
Underside of a floor – with 3mm border. This is meant for placement of guiding pegs in the corners – but be careful here, it is easy to be actually too precise here, The floors themselves are not likely to have walls all that precisely lined up, so I ended getting a too tight fit, and had to readjust. An extra 0,5mm between the peg and outer edge does the trick.

And here with pegs in place – I later learned that the pegs should have been placed the other way around (90 degrees turn). But we’ll get to this.
I placed pegs under both floors and the roof, so they fit onto one another.
10x20mm reinforcements for the roof’s walls.
And the roof with side walls / railings – plus reinforcements. In case of roof walls, which are shorter than on the floors (in our meta we have some older buildings made from cardboard),continued use can break them away due to smaller contact surface. I hope these additional supports will amend that problem.

Time for a little check – will the buildings hold the walls?
As you can see – they do, though the fit is a bit tight. They will therefore work as containers for these, although I trimmed down the side railings on the ladder. If the buildings had their walls a tiny little bit higher (say, 2mm) it would be a nicer fit. But that will do, too.
I’ll need more buildings to hold the extras (like the ticket booth and portaloo visible in the top right corner).
As I mentioned before – I noticed the pegs on the underside had to be turned, to fit along with the walls.


That’s how the building looks like – though basically it is intended to have the first floor with entrance on the other side.
Yup, complete with ladders.

Note – the ladders were actually pain in the butt to make – every step being a separate beam, they took a lot of time and energy to cut, and ended being different in width.
Also, 3mm wide beam is generally as low as I can get.
Advice: if you have a different method of making ladders, use it. Plastic ones from certain other games could make an interesting idea…

Looking at the building, I decided it was rather bland. So – I added decorative beams (10mm wide) over and under the windows.
I don’t know about you, but I like it now way better 🙂 though this brought in another problem – instead of clean 100x200mm, the buildings now are 106x206mm (ok, they were 206mm long before due to the ladders). A thing to be kept in mind when designing a bigger building to hold them.
And I guess I will, since Matryoshka (Russian Nesting Doll / Babushka Doll) for those of you who don’t speak Russian) design, while requiring some forethought, has proven to be a very space-effective way of storing Infinity terrain when not in use.
Well, one last part I have to do is build the stairs…
And here’s a problem I have not foreseen. See, stairs are difficult to make anyway, and multiple-flight stairs are even worse. Adding to that, I started this project assuming that 3 levels of a building (ground floor, 1st floor, rooftop) is basically what we use in a game of Infinity – no need for more.
In my meta, that has proven true: we don’t use more levels, or do it on rare occasions (running up and down all these stairs tends to eat far too many Orders). But there are folks who want their buildings taller.
And here comes my head-on crash against the Reality.
A building of the type I designed should have a multiple flight staircase, most likely of a zigzag type. wide enough to hold a model (so steps 25mm wide, preferably 30mm), plus a docking collar on top so another level of stairs could be accommodated. And a platform allowing you to turn around before the next flight of stairs takes you to another floor.
For such a zig-zag, I’d need 2 outer walls, an inner (central) wall, and 2 sets of steps. The steps are at least 25mm wide, each of the walls is 3mm wide. Plus the docking collar, at least 3mm wide again. That’s 62mm. If I go for 30mm steps (as I should) – I’m facing a staircase that’s 72mm wide. In either case – more than the ceiling of a building, which hangs 60mm over the floor. No chance to fit it neatly inside.
Sorry, unless you come with some neat elevator / lift design, we’re limited to 3-level buildings with these. Should’ve made these walls taller…

Right. The stairs I decided to go with have 20mm deep, 30mm wide steps that should be enough to hold any miniature on a 25mm safely enough. A platform on top offers 30x30mm space. Railing is 20mm tall on the platform and the stairs. I managed to secure an accessway under the platform, so the stairs aren’t going to block access to the ground floor entrance even if the building isn’t assembled with doors on opposite sides. The end plate is 83mm tall and 36mm wide (as to cover both the steps’ width and both side walls).

Some construction notes, as I managed to botch (and then repair) the first staircase I made here:
The steps aren’t likely to be precisely the same length, especially if – like me – you are going to use leftover material (namely, door and window cut-outs). I failed to notice that, and in the first staircase the steps weren’t able to meet the opposite wall. They sticked to the external one, true, but that was it. Placing a model on them would, sooner rather than later, result in a given step breaking off. So – I removed the internal wall, cut an inserted some extra slabs of cardboard and made them into supports for the steps. Now the construction is rigid and stable. This also solved the problem of having open space under the steps – someone would eventually try to hide there, or at least ask whether he could shoot between the steps (we’ve ruled that out in our meta long ago), resulting in problems with access and measuring.
If you prefer to have such option available on your terrain, some small triangular supports should be able to secure the steps just as well, while leaving free space.


As you can see, both staircases fit snugly inside of a single building level.
Well, we could’ve called that done, couldn’t we?
Actually, almost. Time for some bonus content.
Internal walls
The rooms inside aren’t very large, but wouldn’t it be boring to have all these rooms look exactly the same way? You enter a building and there’s always the same single open space inside?
I admit – I was inspired by the MAS internal walls for the District-5 buildings.
The walls are very simple – just some 6mm pieces connected at 90-degree angles (which makes them freestanding), and with a standard door cut in one of them. An important element, though, is the triangular support inside of the corner – it should make the wall more durable. This should be enough to create small but separated rooms inside – like a bedroom, restroom or (when used on the door) entry hall (a big word indeed for a place just big enough to smile widely inside!).
Let’s move!
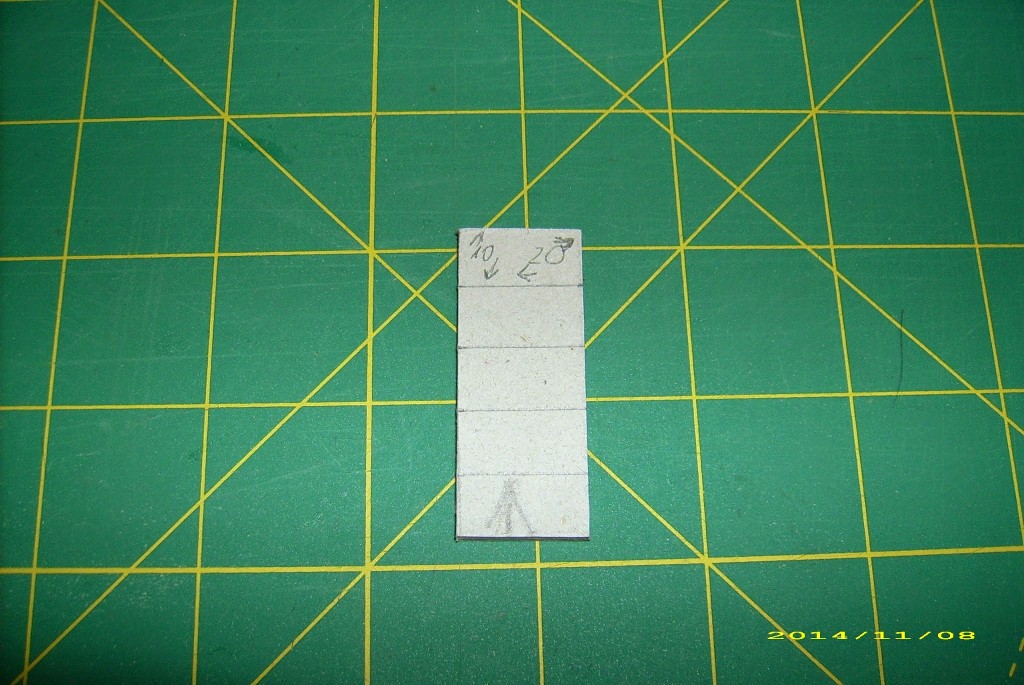
We’ll need some 94mm (or a tiny bit shorter as to not have a too tight fit – I went for 93mm) by 60mm pieces for internal walls:

Then, we need to draw doorframes (30x50mm), and place where our wall will bend. I choose two variants here – 10mm and 20mm from the doorframe. This will leave us, respectively, about 40mm and about 30mm of the wall after the bend. Creating niches more narrow than 25-30mm doesn’t make much sense – a model won’t fit there, especially a dynamically posed one.


Now, check how far should the separated parts slide apart – I went for 20mm. Plus some triangular supports (10mm on the short edge of the triangle) to make walls sturdier:

Let’s glue these together – that’s how they came out. Yes, cutting the window in half looks a bit strange, but I guess I can get used to it. Also, a different placement / sizing of the windows would’ve definitely made a difference here.

And they slide up neatly (even if I had to turn one upside down) for storage:

Let’s try the corner ones.
Since I want these to separate out a space roughly 50x50mm, I’ll need one piece 50mm wide, the other 47mm wide, both naturally 60mm tall. One with a doorframe cut in it.

There, a squad of Funduq Sultanate troops takes up positions in a building:

End notes:
So far, I ended up with 4 floors, 2 roofs and 2 staircases. As usual, making them comes way quicker with some practice, so I may build myself some more soon. With some variants this time, I guess. Like an equivalent to MAS District 5 Garage. Or something with different windows (smaller / fewer / more numerous / none / more ornate). Also, I might swap the internal supports of the roof’s railings for a decorative (and supporting) external beams like the floors got.

The set has enough internal space to hold all the components of itself (staircases and internal walls), as well as the wall set I made for the Cardbuilding #2, including its bonus content. Sure, it isn’t as flashy as the lasercut MDF sets available on the market, but it will definitely do when I need a table filled. Plus it will surely look better when painted (as usual). The removable internal walls help breaking the monotony.
I might also try and do the next step of a Matryoshka design – create a building to hold these buildings. Assuming I’d want each level to hold at least 2 floors (side by side) inside, it will require at least 206mm by 212mm internal space, and at least 72mm headroom (85mm, if it were to hold the roofs, too). Which would result in something a bit larger than the standard Objective Room).

The full set – since the walls are 19cm long, I think I could safely call it a 40x40cm compound packed to the brim (way denser than I would consider it comfortable for moving the models) with terrain. How do you think, would that make for a quarter of a standard board? One-third? Could do for a half board, but it would be stretching it, I guess.
And it packs up into that:
I was also left with some leftover pieces of cardboard I intended for a moment to turn into furniture (and I probably will), but this text has already grown bigger than I intended it to be.
Therefore, kudos points if you managed to read through it all! 🙂


This series are probably the best articles on data-sphere. Good job and keep ’em coming!
amazing! Bookmarked for future use!
Well, part #4 with more variants of the existing buildings is in the works.
And I’m awfully glad to hear you guys like what I do!
Errhile, without a doubt, if I lived near you I would pay you money to build these for me.
Thank you 🙂
Still, you have all the hard data nad know-how in the texts. Now you only have to find someone willing to make use of these for you 🙂
I concur. Excellent stuff. Inspirational. Keep up the good work.
For ladders I have used large staples pushed in place as rungs with a spacer between them and the wall. When I remove the spacer and add some hardcoat it works great.
Well, part #4 with more variants of what I’ve shown in #3 is making slow progress.
Staples are a neat idea (I came up with using a 3x3mm wooden beam, they sell stuff like that in model shops). The only reason I’m not going to switch to these is because I want my cardbulids to be a testimony to how far one can go using just one affordable medium 🙂
Fantastic and thank you for sharing such a detailed walkthrough. I’m thinking I need to have a go at this using printed paper textures. Looking forward to seeing the next installment in the series!
Glad you like it 🙂
If you could print on 2-3mm thick cardboard, it could be marvelous. However, I’m afraid that it would be difficult to cover the edges this way.
I gave a thought to the idea of using pre-printed textures as wallpapers (both externally and internally), but I yet have to give it a try (I’m not very enthusiastic about it, plus I have 3 more Cardbuliding articles to write… and writing is quick, it is building the models themselves that takes quite some time…).
Of course – ideal thing would be to create a program for a hobby cutter, and have this stuff come out of a machine ready for assembling…
This articles are great! i am already building my own terrain, which is mostly 1″ PVC piping for the “industrial” part of town.
I am also adding a few walls from the other tutorial, and let me tell you; cutting through 3mm of this material is NOT an easy task.
The walls could be made off 2mm cardboard just as well, 3mm is actually overkill since there are effectively 3 layers in these walls.
As for cutting – dunno, perhaps I got used to this… just don’t try do cut it thorough in one pass! 4-6 passes do this for me (depending on how fresh the blade is).