
Cardbuilding #5: Centerpiece / Storage Unit

Well, we got there. And it is going to be a little bit tricky, so we have to sit down and think.
By now, we have 4 types of modules.
Basic rectangular ones are 106 x 206mm, including their decorative / support beams.
Long “barracks” are 106x306mm. They are atypical as they have double-sloped roofs (all the other buildings so far have terrace roofs that can be stacked onto one another), but the roof’s height was chosen to be the same as stackable terrace roofs.
L-shape are 206 x 206mm, what we have to keep in mind though is that they have beams on the inner L walls too. It will add to the overall size if we keep more buildings together.
Small ones are 106x106mm.
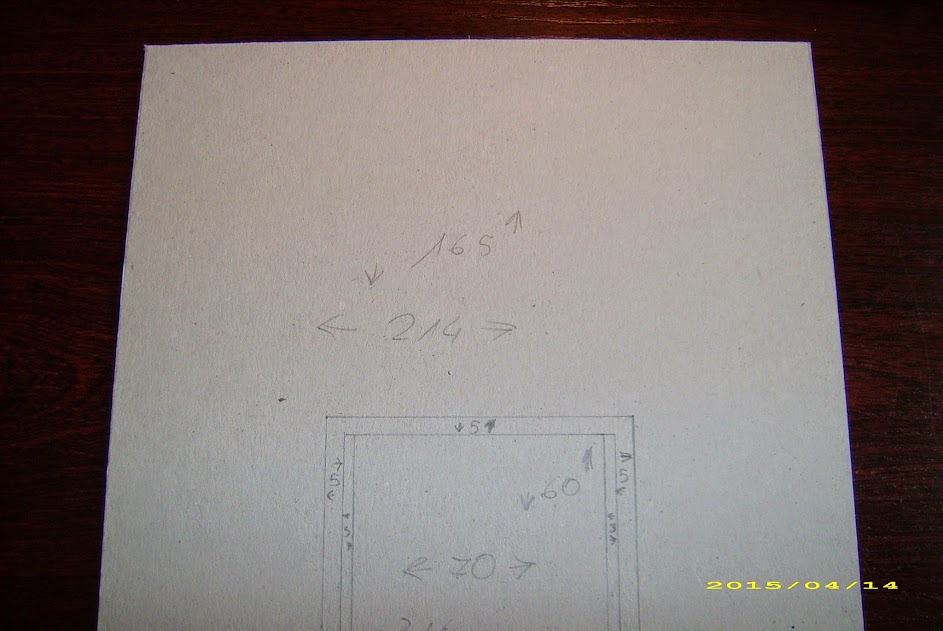
Now, we can make a roughly square building to hold either two basic ones, or one small and one L-shape. It will need about 212 x 212mm of internal free space (plus a bit more spare room, as to not have a too tight fit). It would actually do as an Objective Room for scenarios, too (a little bigger than the 8×8” the rules call for, as including wall thickness and internal space it would be closer to 9×9”). Keep in mind it wouldn’t be able to take the elongated, 300mm “barrack” houses from Cardbuilding #4.
Or a rectangular one to hold two L-shapes or long “barracks”, 3 basic ones or 6 small ones (or a combination thereof). This would need to be at least 212mm wide, and at least 318mm long. I consider it to be the largest practical building for a tabletop that is 4×4” sized.
A larger rectangular one – 212mm wide, 424mm long minimum – would be an option too, holding inside 4 basic buildings (or 2 L-shape and one basic). As well as a larger square one (318x318mm minimum) holding 3 long barracks, or 4 standard floors and a small one. It would be, however, close to 1’1” x 1’1”, so taking 1/16 of a standard 4×4 table all on its own.
We could escalate this further. However, I don’t want to end up with a monstrosity taking half of a table all on its own (it could be pretty impressive, but not very practical, unless you’d want the same centrepiece every time).
Keep in mind – the estimations above assume a single open space inside. Any internal wall would increase it by at least 5mm (3mm thickness of the board, at least 1mm fit space. Preferably 2mm) and interfere with the buildings you would be able to put inside (especially the L-shapes). Observation from filling Cardbuilding #2 walls into Cardbuilding #3 basic rooms – they fit in really neat, and don’t rattle – the walls, let me remind you, are 190mm long, and the rooms have 194mm internal free space (buildt on a 200mm floorplate, minus 3mm thick walls on both ends).
You’d need every floor to be about 70mm tall (holding one level inside, with roof being stored separately) too.
OK, we’ve dealt with width and length, now the third dimension remains – height. And we need to make decisions.
First, let’s take the buildings already made into account. They’re 66mm tall – 60mm of the walls, 3mm floorplate, and 3mm pegs under the floorplate.
The roofs are – by the same logic – 26mm tall.
Therefore we need:
66mm internal height to store a single floor.
89mm internal height to store a single floor with a roof piece (remember, roof’s pegs don’t count – they will hide inside the floor. Unless you intend to put two roofs together in a clamshell-like fashion to gain some 40mm tall storage space).
132mm to store 2 floors.
155mm for two floors and a single roof.
178 for two floors and two roofs.
192 for 3 floors. Add another 72mm for 3 roofs (which would make for a whopping 264mm internal height).
Now, we could do the storage building as separate floors. This would allow us to arrange it into two low but large buildings, or a single massive one. This makes for a more interesting terrain piece, but less effective use of space inside for our storage purposes. Also, my group has some problems when it comes to “playing Tetris” with our current terrain after a game. So I’m not looking forward into doing it to them!
Or as a single building. Which would be quicker, take less material and give us more storage space inside, but likely a less interesting piece on the table.
Okay. What such a big building could be?
The multi-story one (especially if you build it with internal walls) is likely to be public one. An office building, a school, a hospital? Any of these makes sense, but would require pretty a lot of rooms to be made on the inside.
The single-floor one is going to be pretty cavernous. A huge warehouse is the simplest solution, but also the most bland. A factory hall is a bit better. How do you feel for a cinema though? Or a temple (appropriate for your favourite faction – a church – either PanO or Ariadnan Orthodox, a mosque, a Taoist shrine? I don’t even dare to guess how Nomads deal with religions) I once had an idea of a massive (for a table-top scale, that is – say, 3’x3’) shopping mall…
Temples are actually a nice choice (though politically delicate these days) as they don’t actually need much features on the inside. For example, most Christian temples will need an altar and some benches (and a large crucifix of course), with optional add-on features like a pulpit and a baptismal font. A typical mosque needs even less furniture (primarily a minbar, which is essentially a form of pulpit. The Mirhab should be a construction element, thus I do not include it as furniture).
The small rectangular is also to fill the niche of an Objective Room. While it will be noticeably larger than CB advises (212x212mm internal space calls for at least 217x217mm footprint, and for convenience I’d round it up to 220x220mm. This would also allow me to make some structures on the inside of it, as long as they wouldn’t be thicker than 3mm / single layer of cardboard.
I guess I’ll build it as a store.
There are many, many possibilities.
Myself, I decided to test out the smaller rectangular (for 3 basic buildings) and square (2 basic buildings) models, giving them enough height to hold 2 levels and a roof.
My current cardbuild terrain consists of:
2x L-shaped buildings, which would take 1 level of a rectangular building
2x long barracks (30cm), which would take 1 level of a rectangular building
2x small buildings
9x standard buildings
1x TAG hangar (double-height, standard-footprint building).
Okay, practical part:
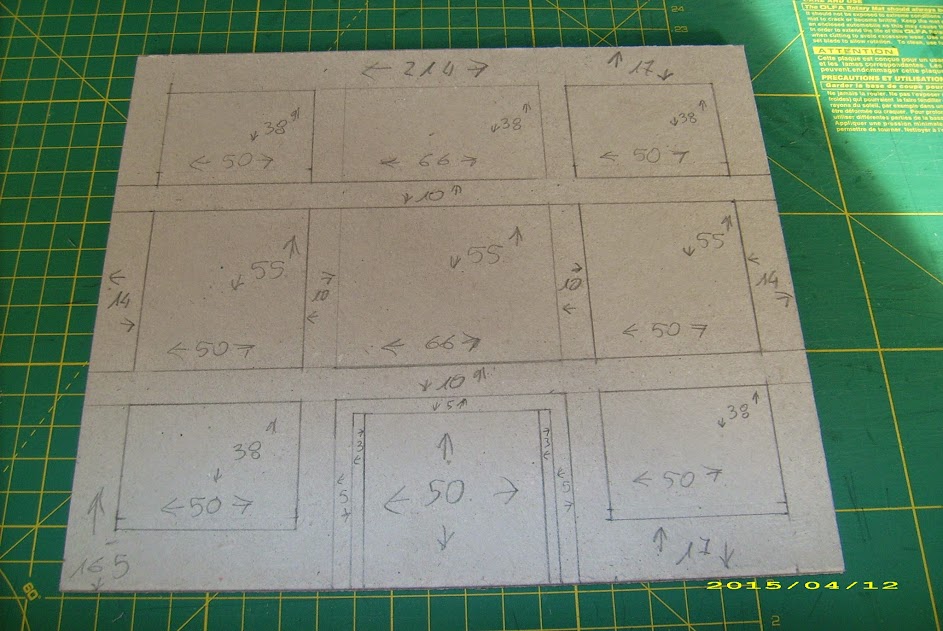
The smaller, square building / objective room uses 220x220mm footprint, and 185mm high walls. This will allow me to have 2 floors, 2 roofs in clamshell fashion, and still have enough space for the roof’s corner pegs.
So, the floor and roof will be 220x220mm.
the walls will be 220x185mm (long ones) and 214x185mm *short ones).
Note: add 5mm or so to each dimension of the footprint. I made it on a 220x220mm footprint, and the resulting building is too small inside: I can put 2 L-shapes inside, but adding 2 small buildings makes it an uncomfortably tight fit (turning the small buildings upside down helps that down to an acceptable level, but means the storage space inside of these is lost).
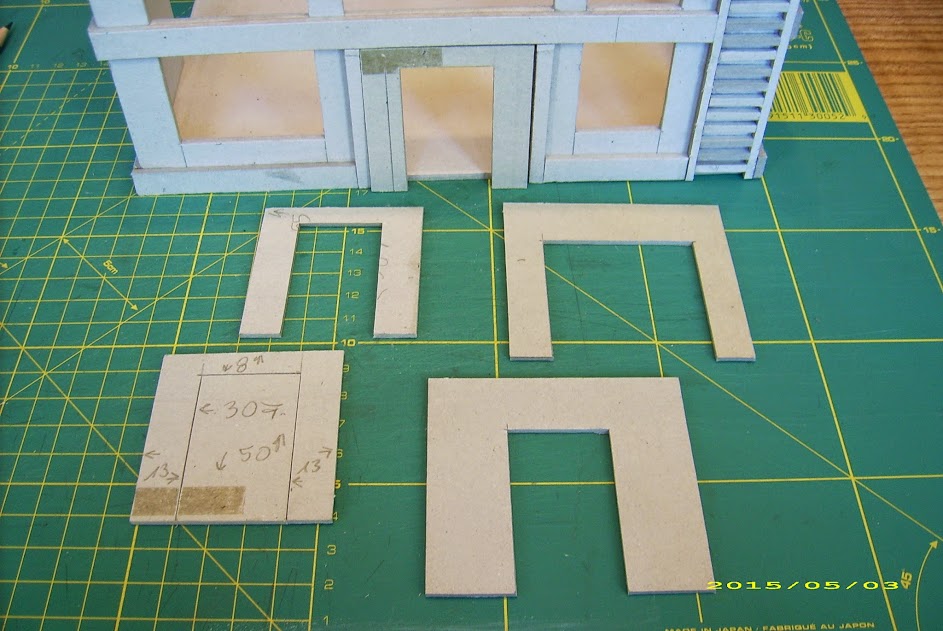
OK, let’s go
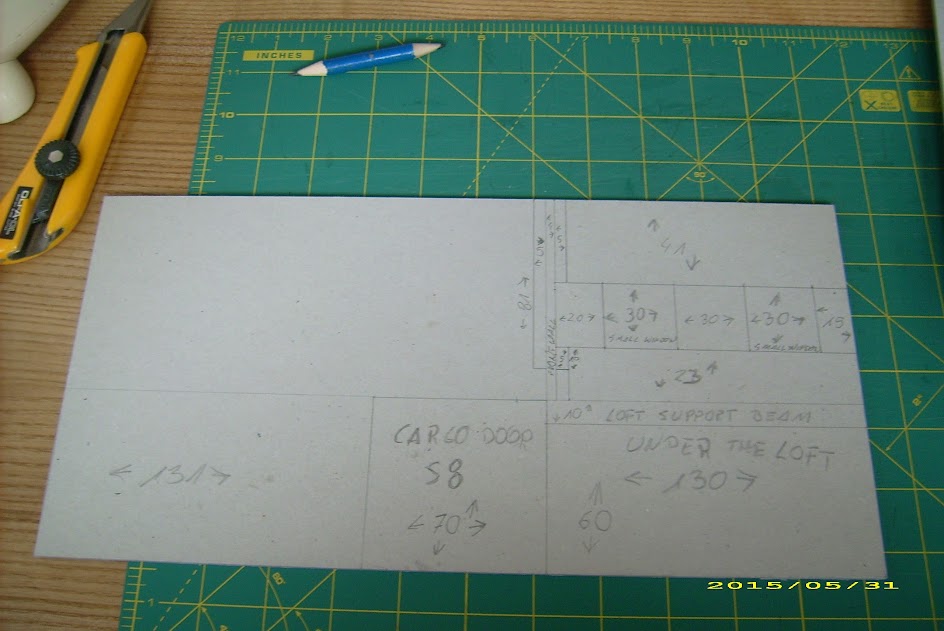
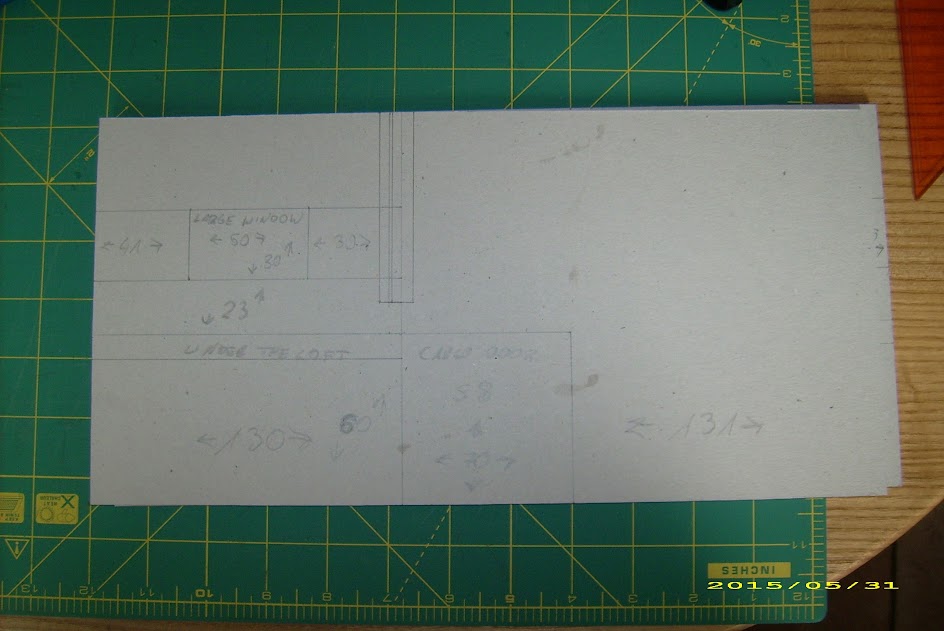
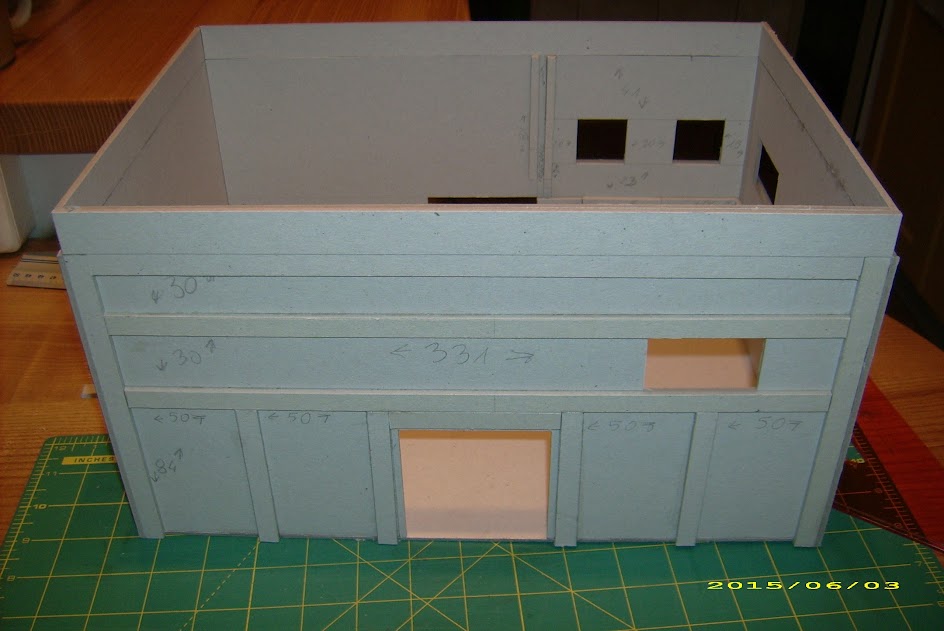
Front wall:
2. Side walls:
(naturally, 2 of these will be needed).
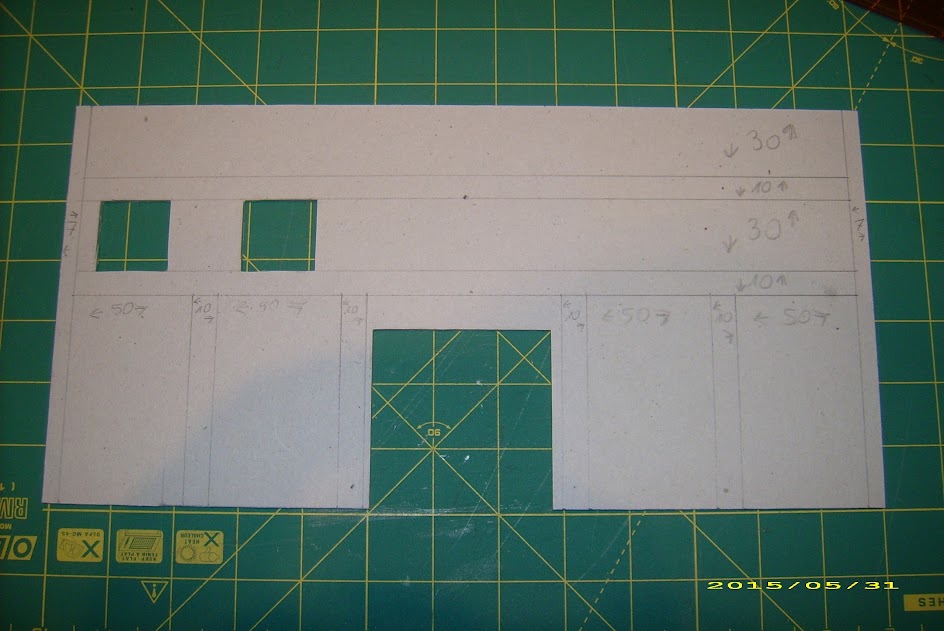
3. Rear wall:
Please note that front and side walls have wide access, while the rear wall has cargo access.
Optional inserts allowing to change access size will be made later.
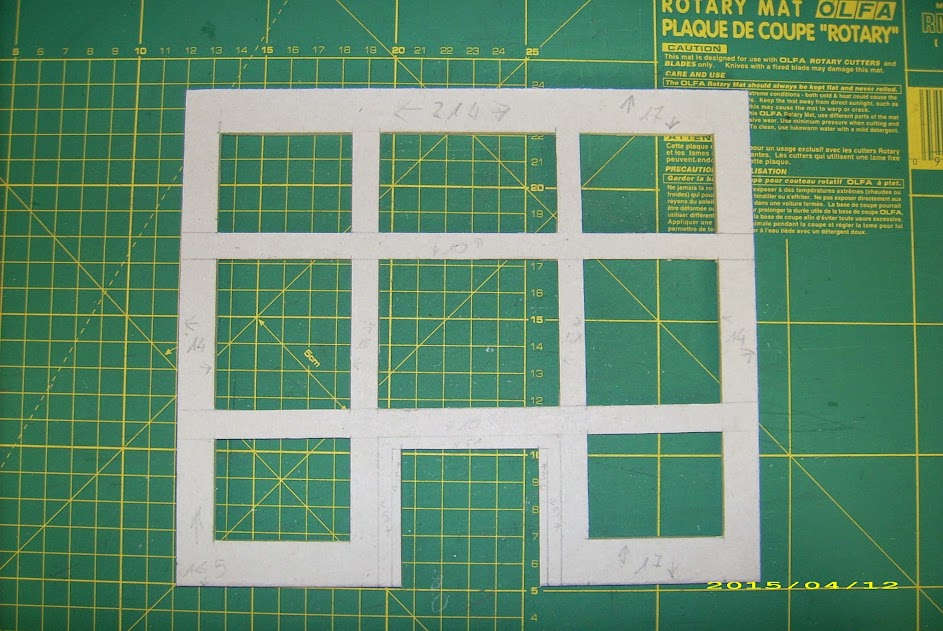
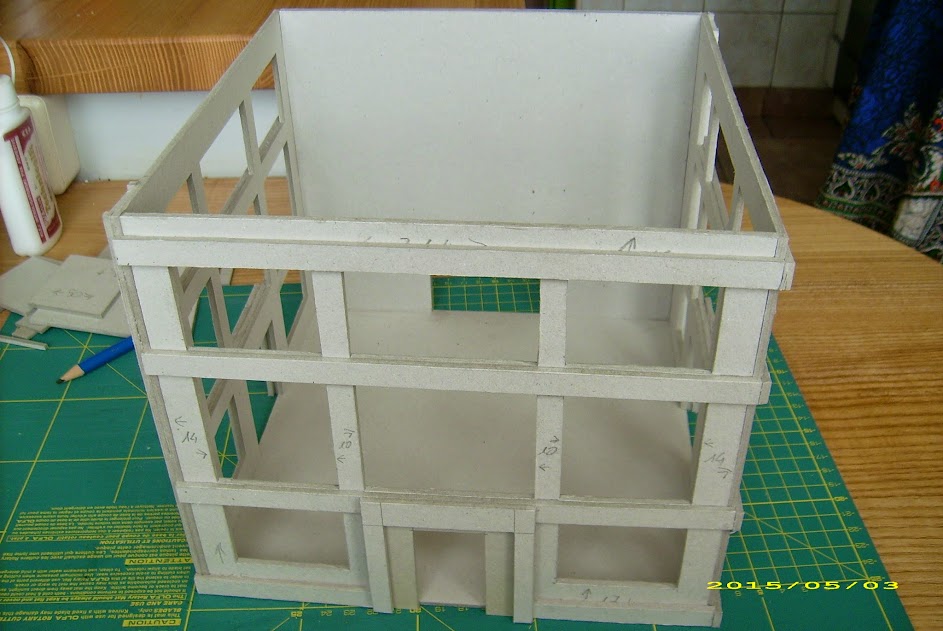
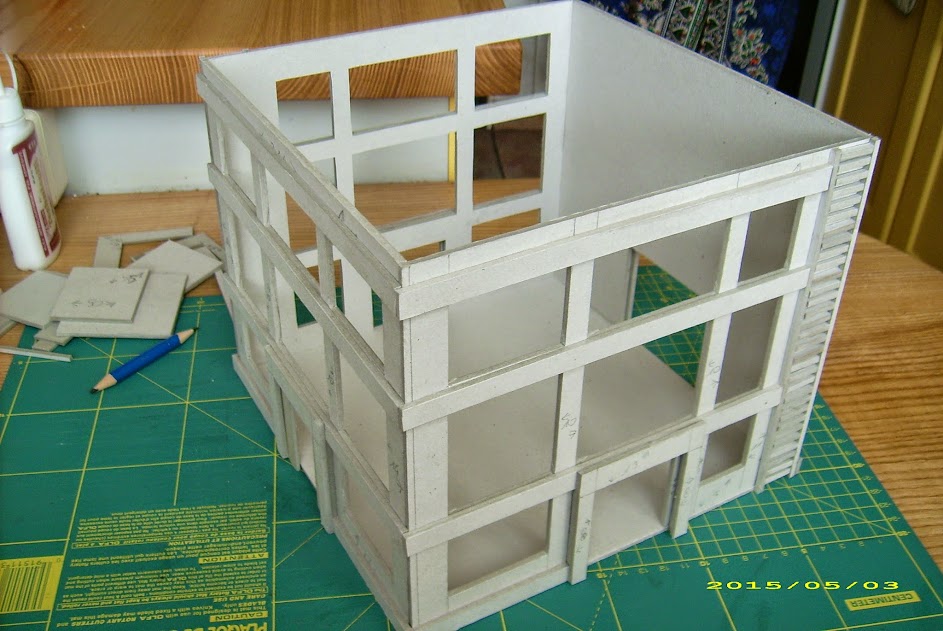
Fine, let’s put it together:
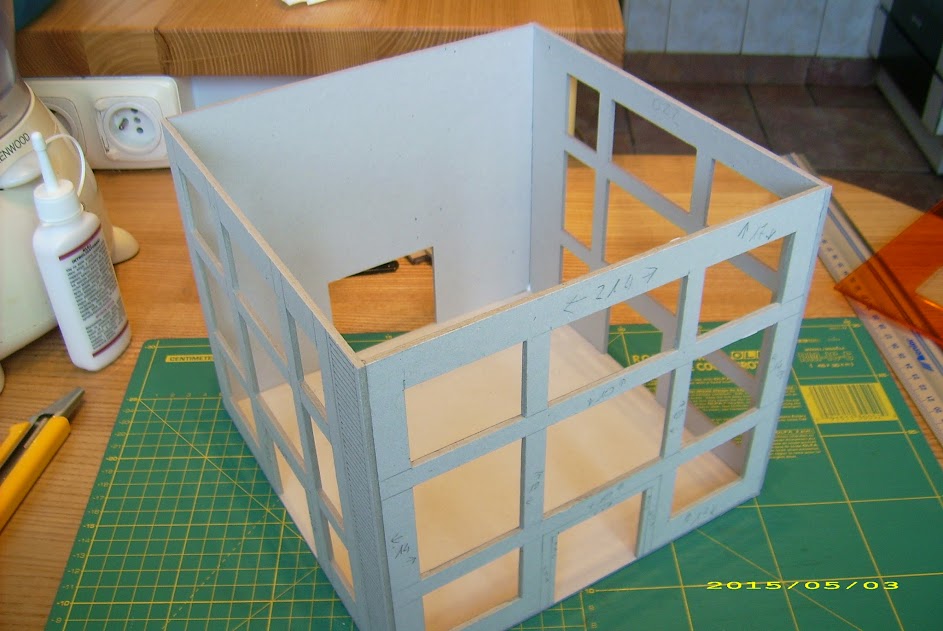
Support beams you’ve seen on all of the previous buildings in the series are becoming pretty crucial here – the walls are large, and with all these big windows, they need reinforcing.
Two important details here:
I’ve added support beams along the bottom edge, which do also cover the joint between floor and wall. This was made to reinforce the joint – while the floor on its own isn’t likely to make any trouble, I’m not so sure how long will it stay in place once the building is filled with smaller modules for storage function.
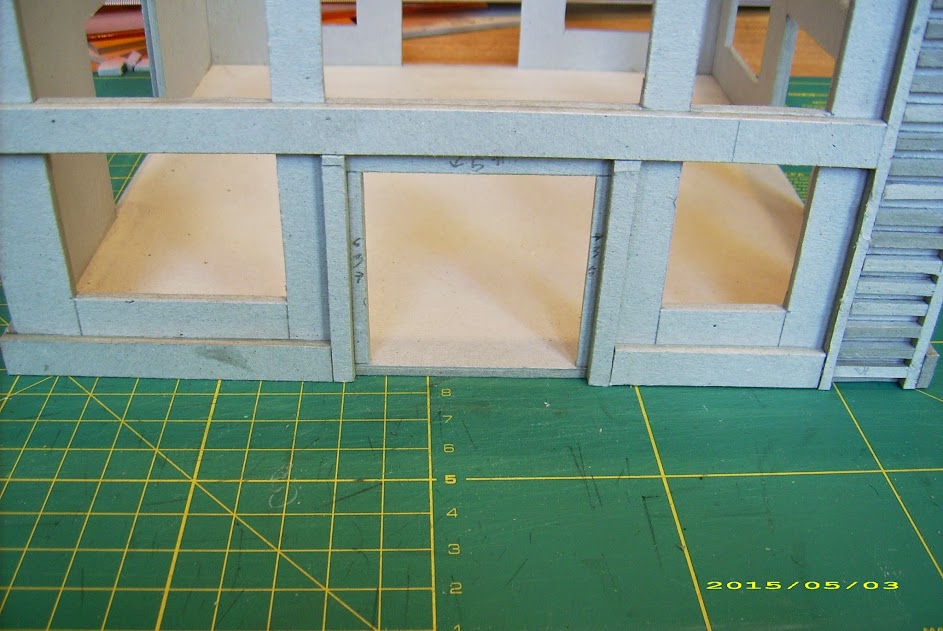
There are 5mm wide bars on the sides of the door. They are there to provide side rails for optional entrance inserts.
See them in detail (and yes, I made them 2mm too short and had to fill it up with extra material):
Here come the optional entrance inserts:
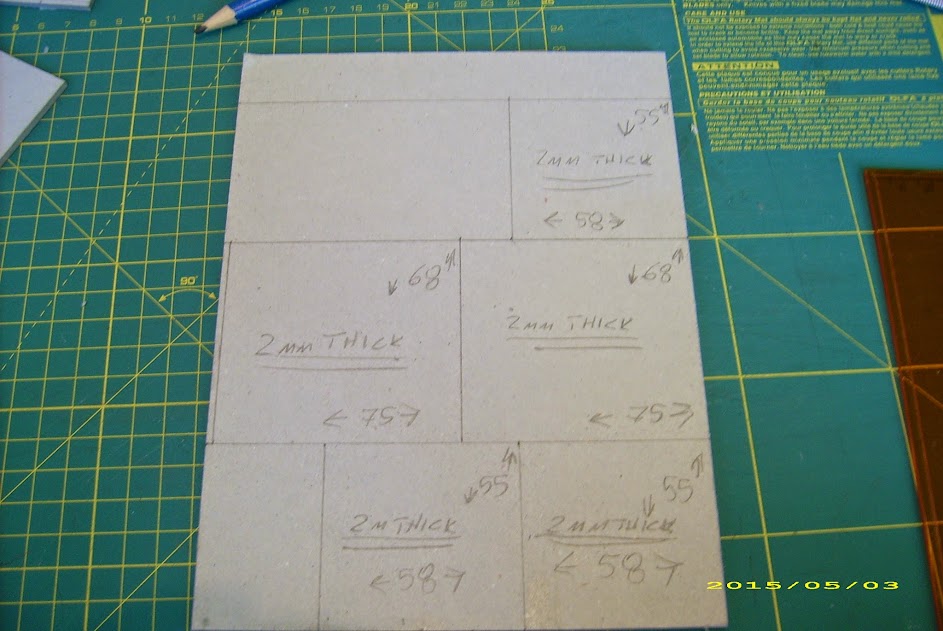
The smaller ones allow to turn a wide entrance into a narrow one, the large ones make the cargo entrance either wide or narrow:
Important note: these are made of 2mm thick cardboard, so they aren’t going to make any problems fitting into the 3mm wide rails.
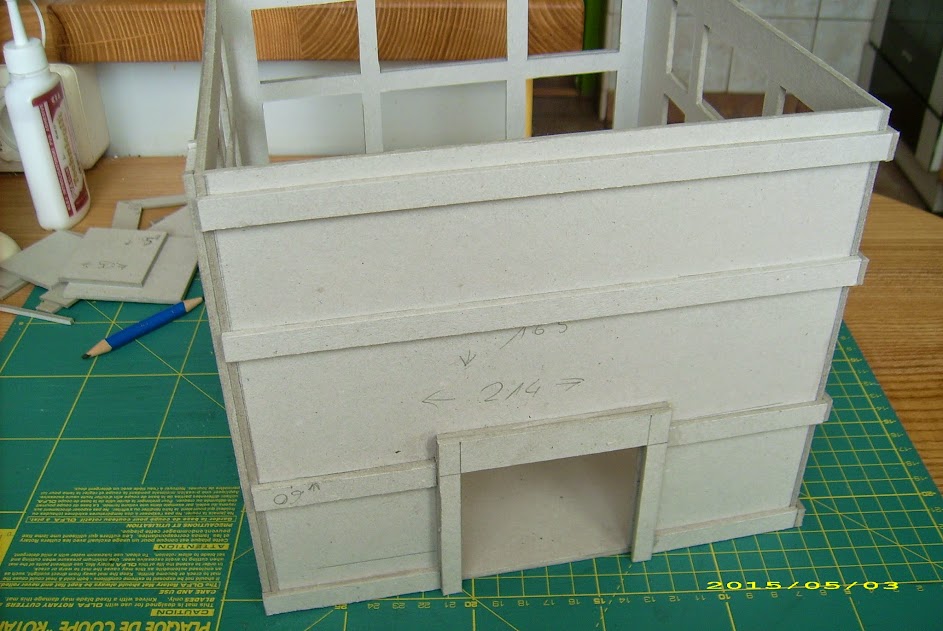
Of course, we need an external door frame to make them fit (these are meant for wide entrances, the bigger one that fits on the rear cargo access isn’t shown).
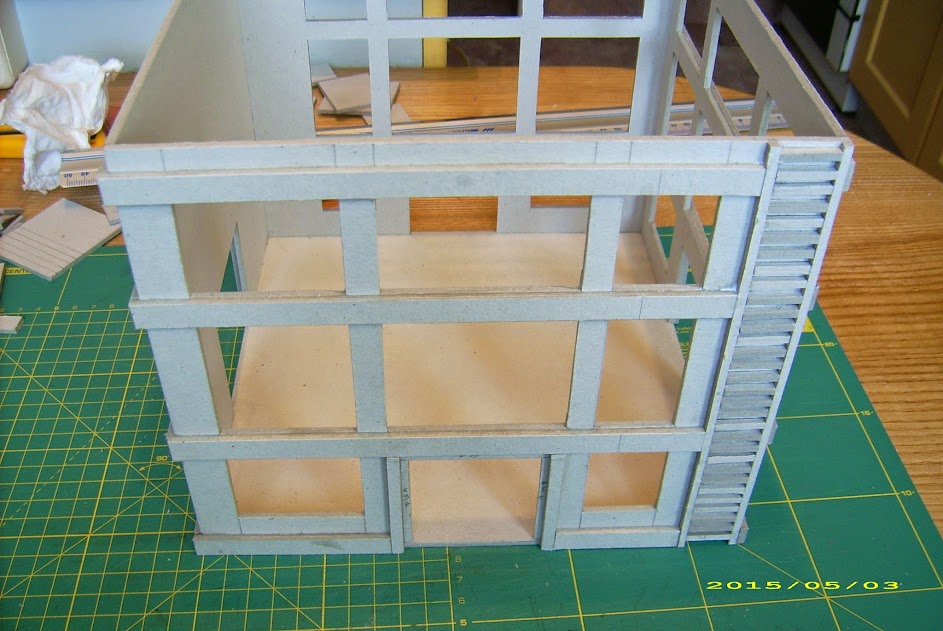
And that’s how it looks like once done – note that one of the wide entrances has a narrow entrance insert installed (it slides in from under the building):
A test fit – as I’ve warned you, the fit is far too tight, and I had to turn the small buildings upside down for it:
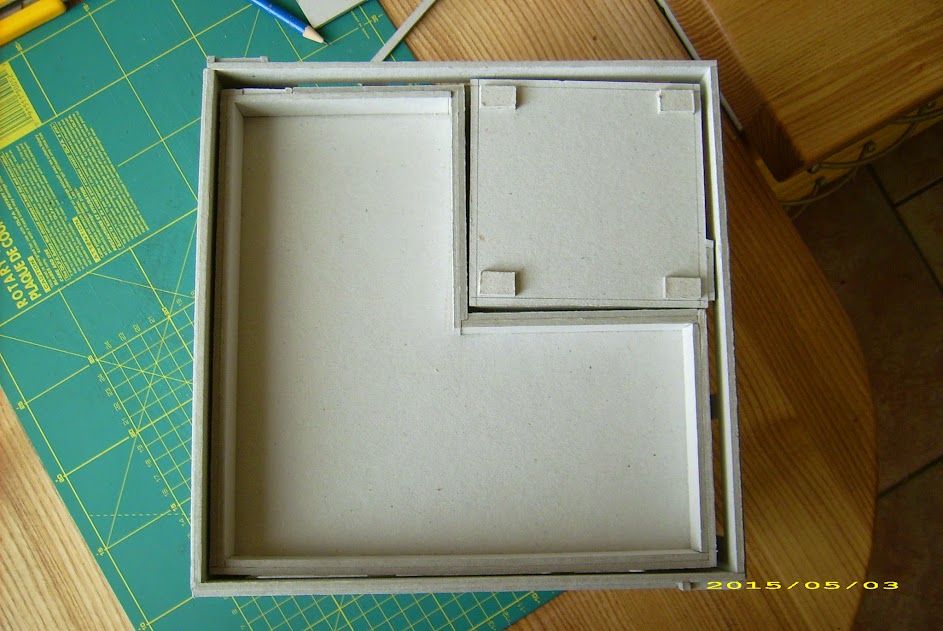
…still, that’s 2 L-shapes, 2 small square ones and their respective rooftops sitting in neatly.
Now, I need to make a roof for that thing!
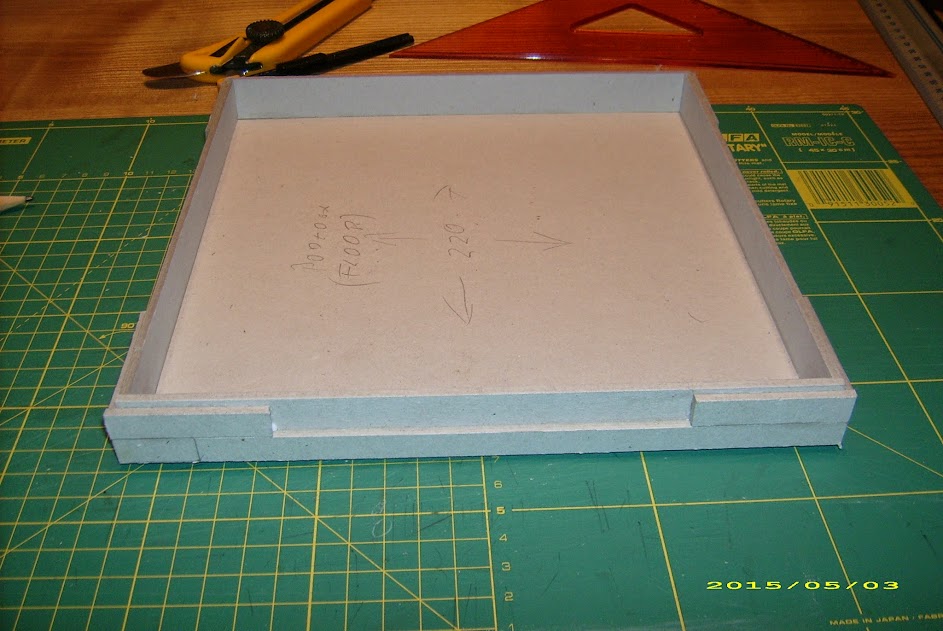
Yup, the piece was originally intended to be used as floor. I mixed them up, but luckily the dimensions were OK.
As you can see – nothing fancy here, just another terrace roof. No ladders, and support beams along the lower edge (covering the joint), plus some more reinforcement on the corners to make it look a bit different than usual setup.
And voila, the objective room / store / centerpiece is done. Here, in it’s storage mode again:
Shiny. Let’s try the big one.
Especially given the experience gathered with the Objective Room. I mean, a 206mm long building fits into a 220mm one nicely. Two 106mm wide ones, not so much (that’s 212mm, in a theoretically 214mm space). My cardboard jobs aren’t that precise – these tolerances are just too tight.
Gotta use wider tolerances.
224mm wide – that should do the trick for my long barracks. As you recall, there are 2 of these, 106x306mm sized.
Good. But what about the length?
3*106 (which is the intended size for basic modules) = 318mm, plus wall thickness and safe margin inside to avoid an overly tight fit. If 12mm was good in the other dimension, it should do here, too. Therefore, 330mm long footprint.
But I’ve measured the actual buildings, and took into account the internal rails (meant for the loft office I’ll discuss below). And calculated it once more.
I will need 320mmx212mm for the buildings inside.
Add 6mm for warehouse’s wall thickness.
Add 6mm for loft rails.
We suddenly jump to 332x224mm. And still need maneuver space. This warehouse is going to be a big piece anyway, so a centimeter here or there isn’t going to make much difference. Plus, it will come handy to store the loft.
Fine. For the last time – recalculated dimensions will be 337mm x 230mm floorplate.
Sounds big…
I decided against building it as a temple. The project is in the pipeline way too long (I must confess, it ain’t the best spring season I had, many things are stalling), so I’m going to keep it simple here. KISS, it is a good way of doing things, ain’t it?
I swear, I’m going to build a temple yet. One day. Just not today.
A warehouse is just a big, boxy, inelegant structure. It will have some cargo-sized doors (after all, it is meant for cargo, isn’t it? I might even go for a TAG-height cargo door, it is nice to be able to drive a truck or a TAG inside, or place it halfway in the entrance, and 50mm-high doors I usually use don’t allow that!). I’ll decide on how many once I’ll have the sides cut.
Windows. Yep, some of them, but placed rather high. More for the looks than anything else, warehouses aren’t build to provide convenient firing positions.
Now, one more trick to keep the warehouse from being just an empty shell. To make it just a bit interesting.
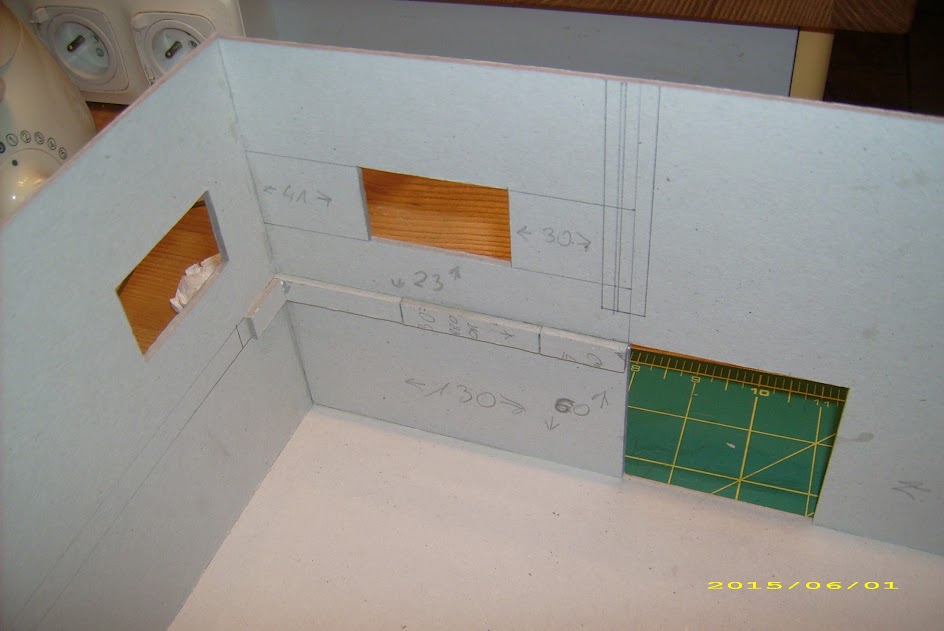
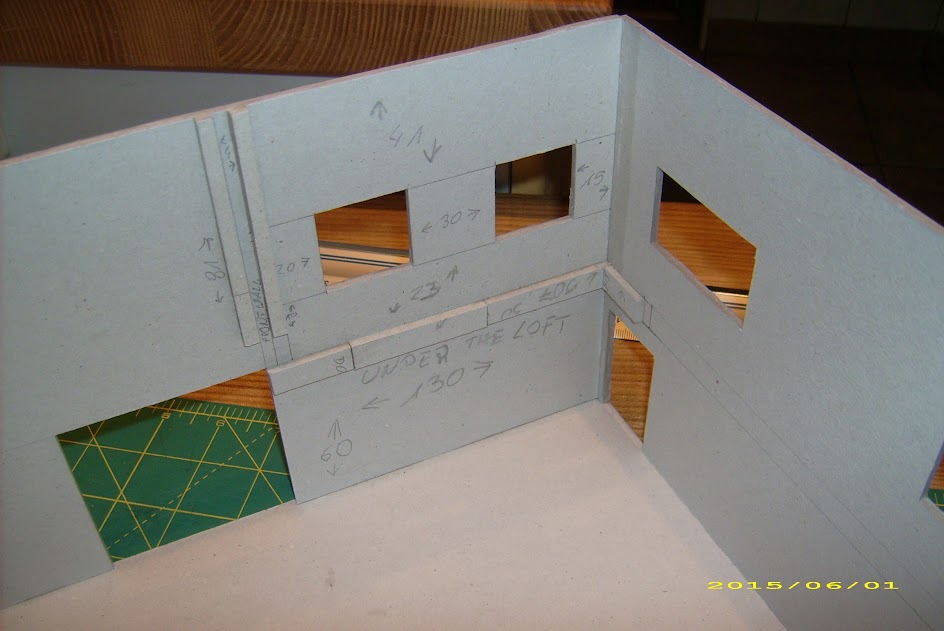
A loft / partial floor office / entresol is a feature common enough in warehouses and factories. It will be pretty easy to add here, too, without making the building overtly complicated. I assume that about ⅓ of the building’s floor size will be a good idea here. All we’ll need is to plan in advance: add rails on the walls on which the floor of our loft will rest (both side walls and rear wall!). If you do it on the walls around the inside, you’ll be able to place out loft on either end of the warehouse (or even use two of these).
Note – as it is the office part, it would be nice to have windows placed on appropriate height for this level. As you remember, my standard is 20mm above floor level. External door is optional, and in fact would look out of place if there is no loft installed (therefore i don’t use it here, but you can, obviously).
Another thing – if you want the loft to be more than just a “shelf” in the office building (I do!), you’ll need a wall separating the “office upstairs” from the general space. Easy, though it will require rails on either side (on the side walls) to keep it in place.
The internal wall needs some windows in it (gotta see what’s going on inside of the warehouse) and a door.
Now we come to the interesting part. You can place the floor of our loft as high as you want, but you’ll need to make up some stairs to access it. I’m going to keep it low enough to be able to use the stairs I made for my buildings earlier! Place it on one side, so I could take either variant of the stairs – straight, or flush-against-wall.
One more thing regarding the loft mountings on the inside of the walls. If these are made out of the 3mm thick cardboard I use as standard, it will eat up 6mm of internal space for the purpose of storing the floors inside. And I won’t be able to compensate with fitting building’s side support beams in-between them, as – being intended to keep the loft on the stairs-appropriate height – they will interfere.
Add 3mm (at least!) in either dimension.
Also, keep in mind that a TAG-height door is going to interfere with a loft. So it is one or the other (or just place the TAG-height access where there will be no loft. Like, halfway along the longer wall).
Catwalks along the walls. Nope, I’m not going to do these. Too much problem with making them removable, and storing them when the warehouse is used as a container.
The roof. I must admit, I’m a little fed up with terrace roofs at the moment. Let’s make it double-hinged roof here, shall we?
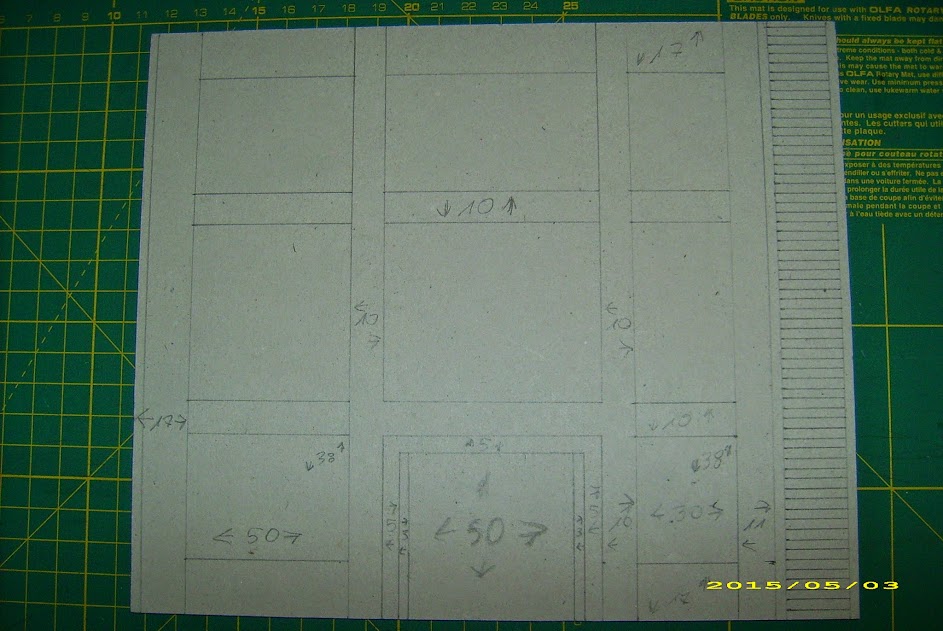
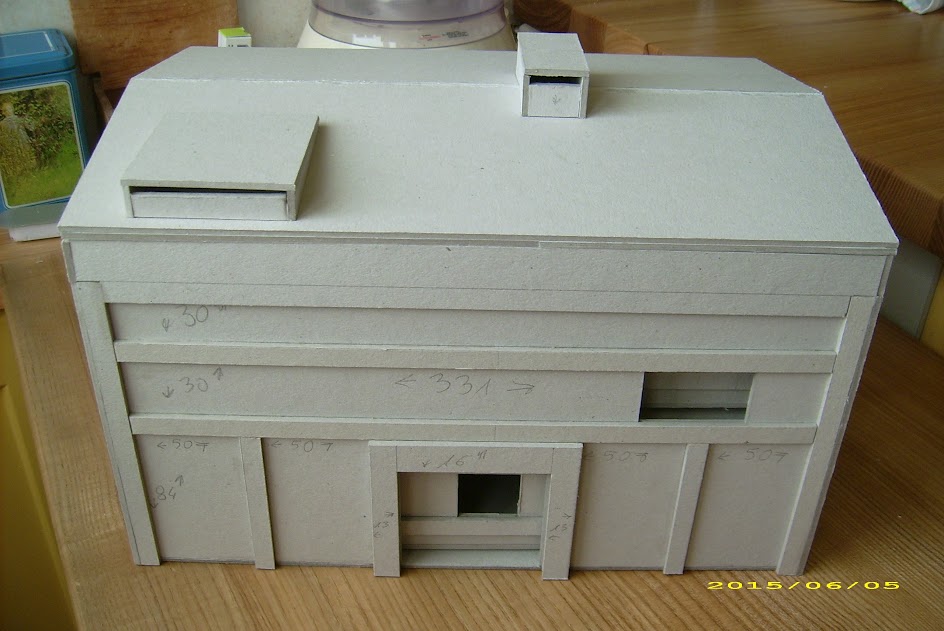
Right, let’s cut!
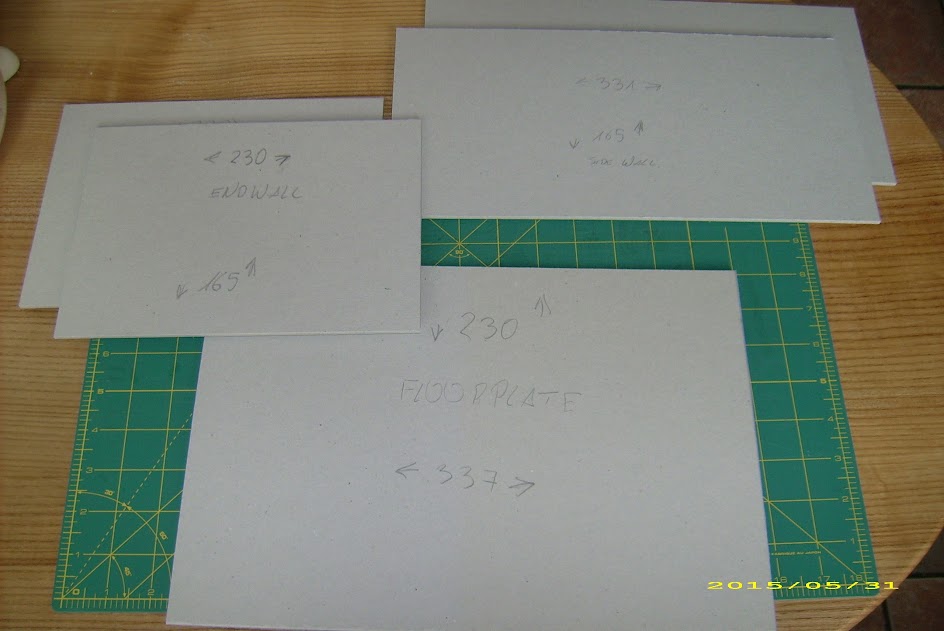
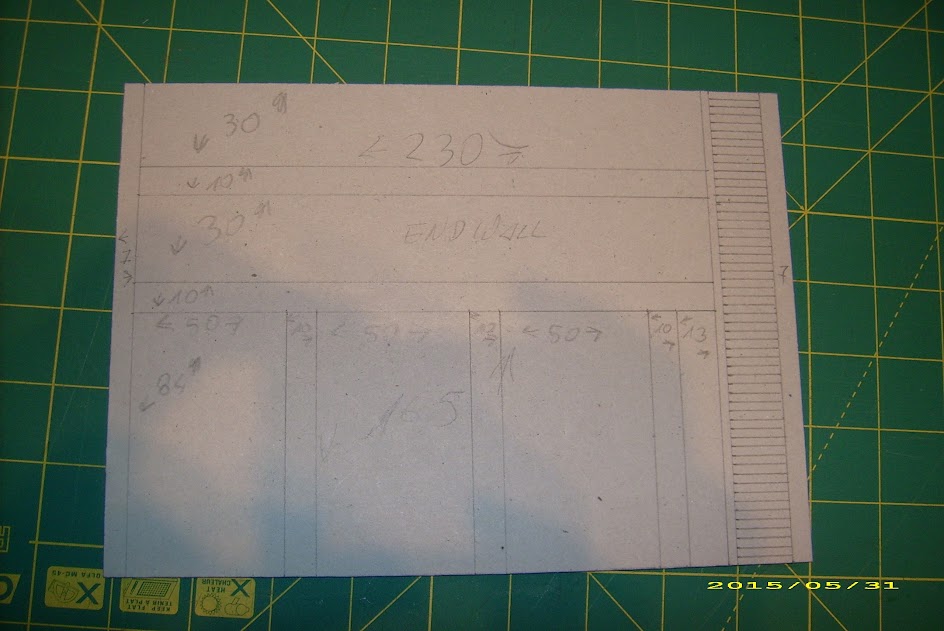
The end walls are going to be 230mm long and 165mm tall.
The side walls – 331mm long and 165mm tall.
Note: it wasn’t until I assembled and test-filled it that I observed that I messed this up.
165mm tall walls are not enough for 2 floors and 2 roofs. I’ll have to do something about that. Like, build the walls higher with some form of superstructure…
I decided to have 70×70 (or Silhouette 8 – sized) “cargo” access in the middle of each of the long walls. There will be only one loft (checking it in practice has shown that a loft, especially one using standard stairs, consumes far too much volume to make two of these acceptable). While I initially planned to have loft accessed from the central part of the warehouse, I later decided against it: it would be eating down too much space, and the straight stairs would be blocking the cargo doors.
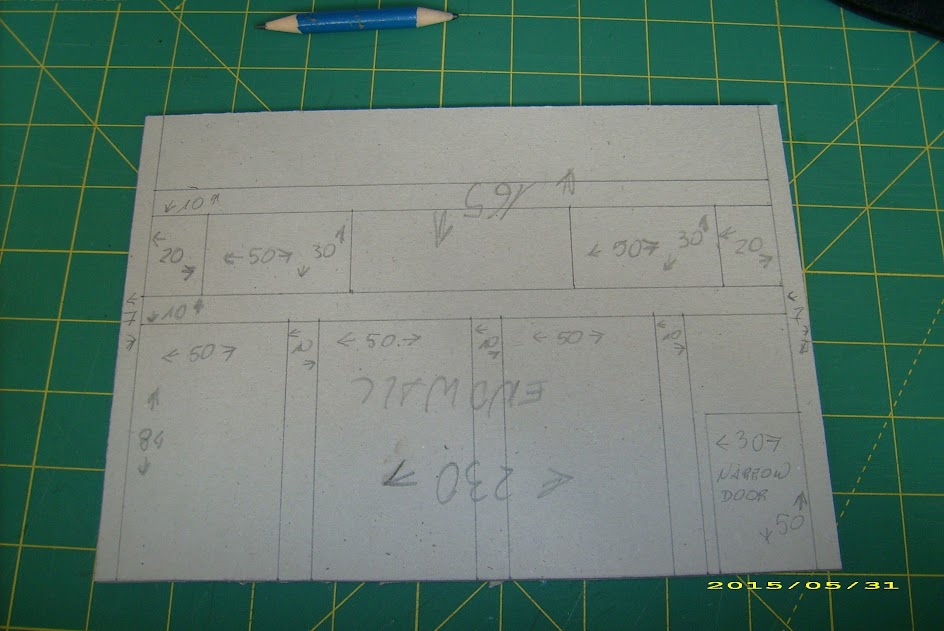
A Narrow Access, 30mm door was also cut in the short wall’s corner, under the loft.
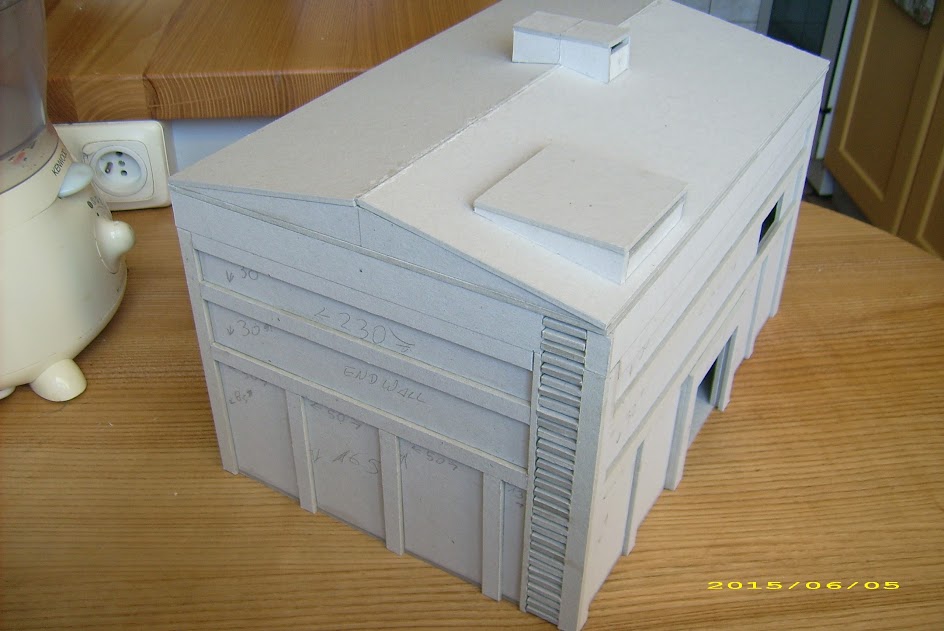
The other short wall will have an external ladder for roof access. All the warehouses and industrial buildings I’ve seen had some form of roof access, usually in form of a ladder.
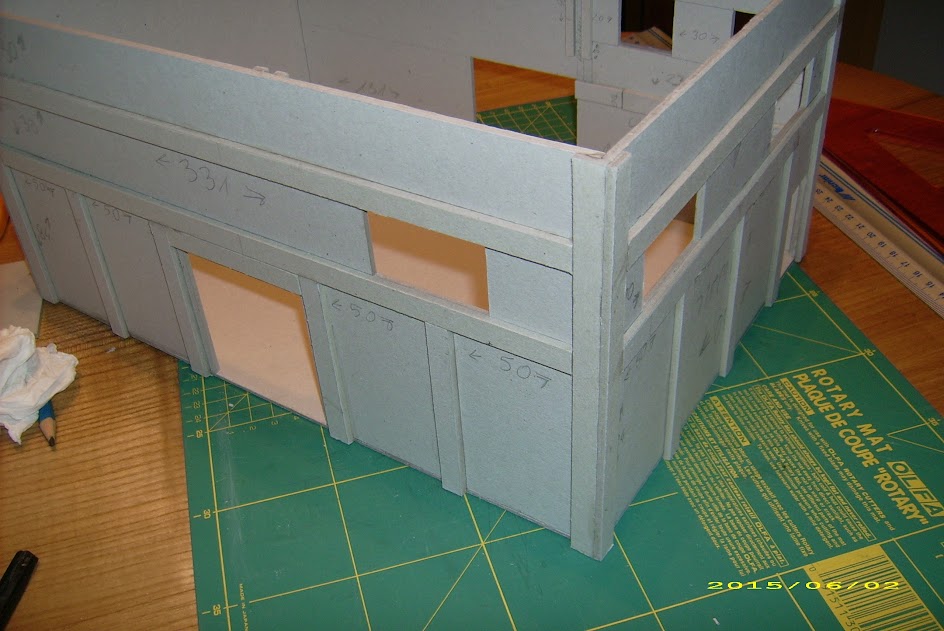
With such a large building, I expect some problems with wall stiffness – and joints strength. Therefore, I planned 10mm wide vertical beams around the corners of the building, and horizontal beams along the walls – under and over the windows of the loft. I might also add another beam along the upper edge of the building, but this is yet to be seen.
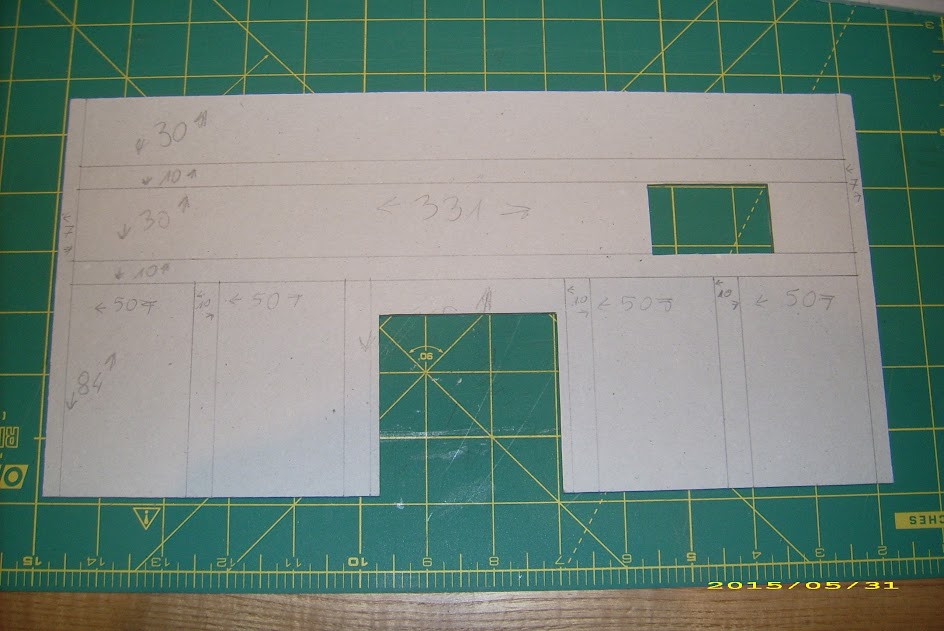
There will be a vertical beam (10mm wide) every 50mm of the wall or so. These will run to the bottom, and help keeping it in place – I decided against running a horizontal beam around the bottom edge for aesthetic reason. See, most industrial buildings are not flush – there are various attachments on the outside. Storage sheds, guard posts, power switches, you name it. With 50mm-wide spacings, an extra like the ones I built for Cardbuilding #2 can be fitted there 🙂
I’m going to make the cargo access doors along the same lines I did them for the “shop” storage / objective room above – equip them with frames that will allow them to accept inserts. While I don’t plan to use 50mm Wide Access or 30mm Narrow Access doors on the cargo gates, there will be such a possibility. I could cut appropriate inserts at a later date if such a need arises.
This, however, is a distant problem.
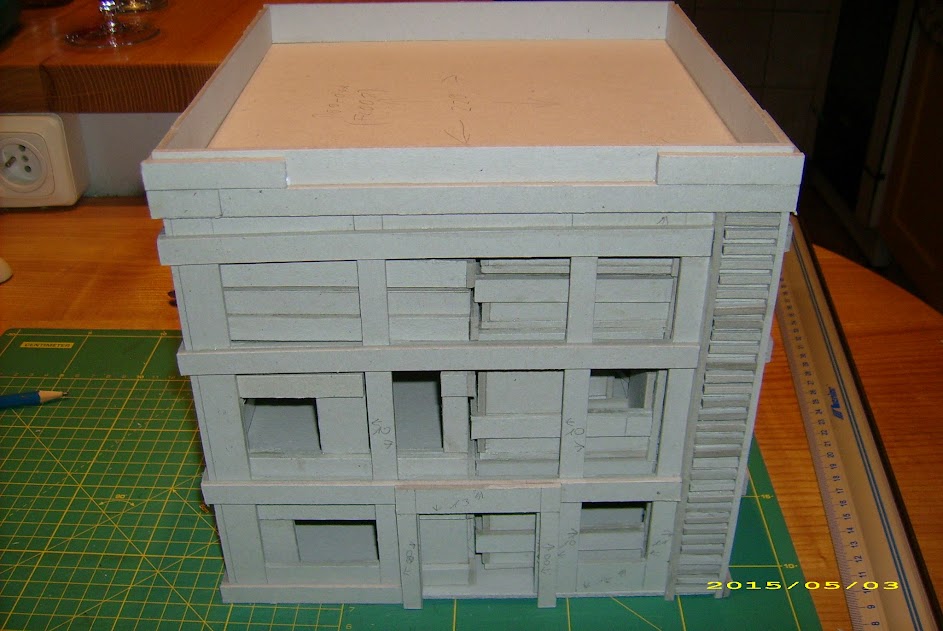
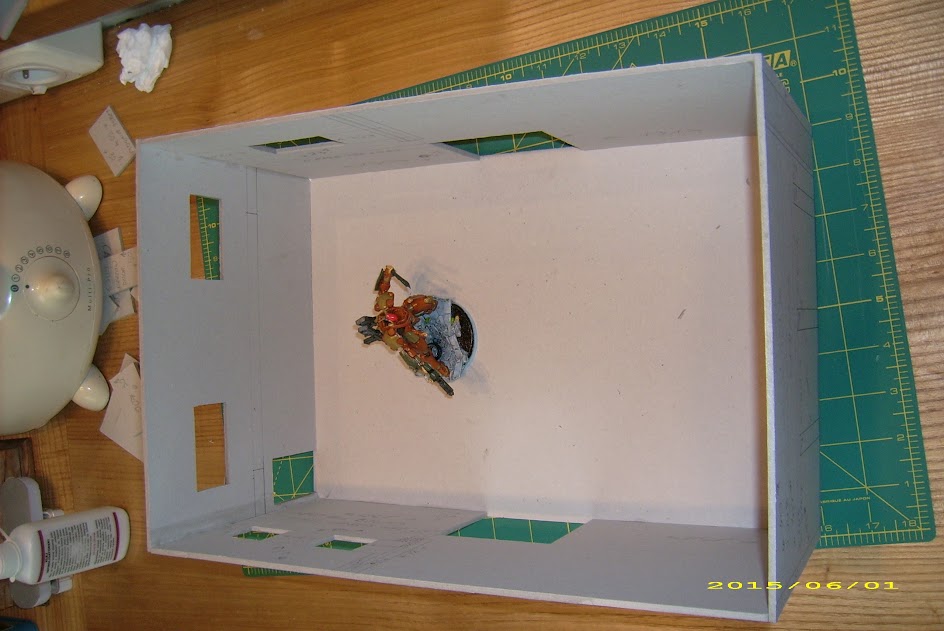
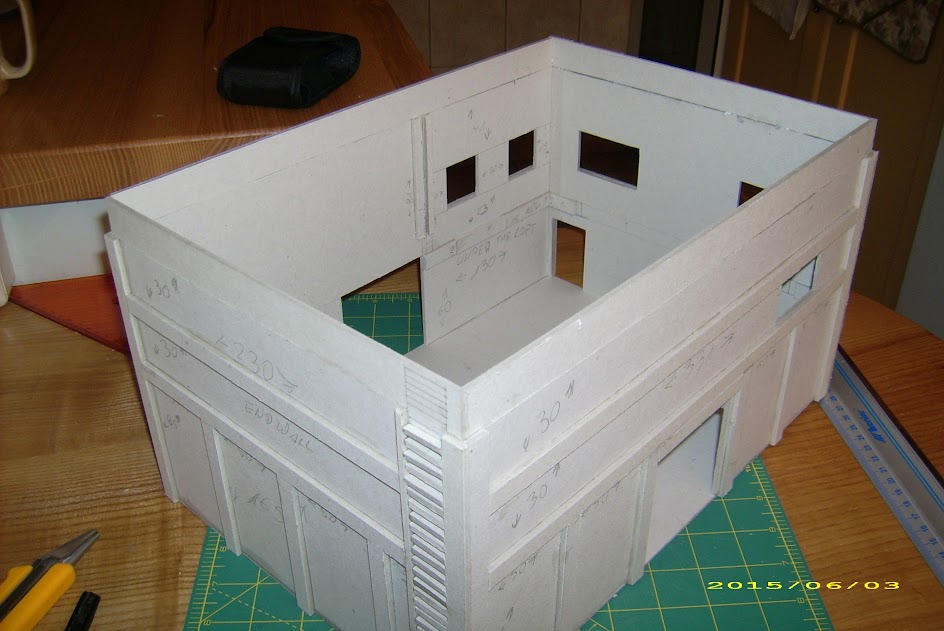
I’ve glued the walls to the floor, and I must say the size of the building is pretty impressive.
Yes, this is my Scarface TAG (on his proper 55mm base) there, used to give you some perspective…

Next step – rails and supports for the loft. They aren’t single-piece, as I decided to use some leftover material for them.
And here’s the external beam grid as I have intended it originally (missing only external parts of the gate frames):
Now, it is time to correct what I messed up in the regard of wall height.
I have 165mm tall walls, and I need 185mm (178mm would do, but I prefer a little extra space).
- I could just add 2cm extra height on top of the existing wall, but:
- It wouldn’t look good.
What’s more important, it would have pretty limited contact surface with the rest of the wall.
That’s how the extra 2cm on top of the wall looks like:
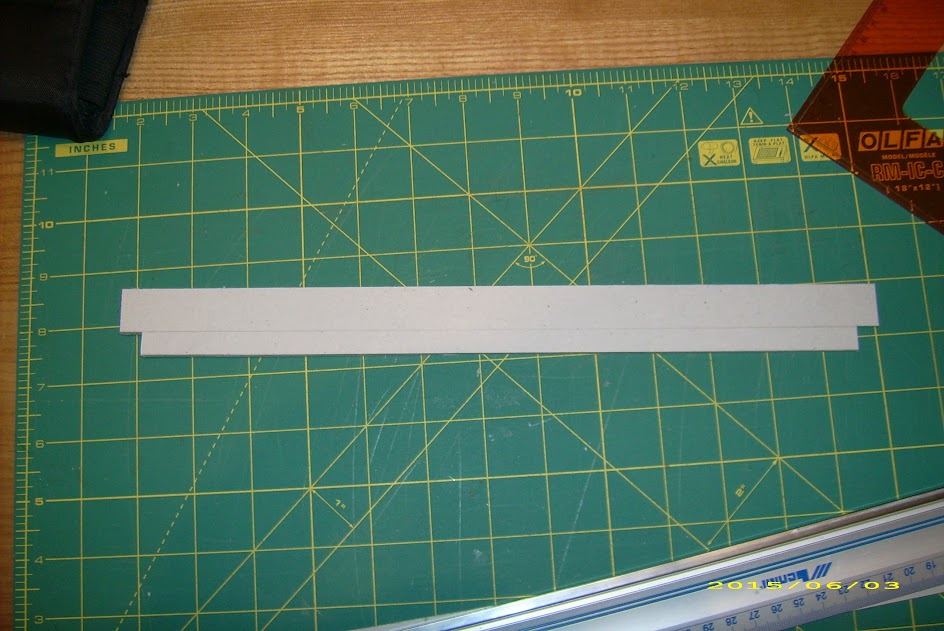
Therefore, I decided to add a wider panel in front of it – a 3cm one, covering the extra wall height completely, and then coming down 1cm onto the existing wall’s face to provide appropriate contact surface. Of course, it will require cutting the corners to fit onto existing corner supports.
Here’s a sample external panel:
And applied:
Also, I’ll have to deal with the ladder on the end wall – I’m going to have it flush with the wall to protect it from damage when the building is handled. This will require to make that part of the front panel of two parts, leaving a gap for the ladder in-between them.
The loft. As mentioned before, it is meant to be used with either variant of stairs I made earlier (though only the straight stairs will fit both ways). I wasn’t convinced by the floor’s stiffness, so I added two support beams underneath.

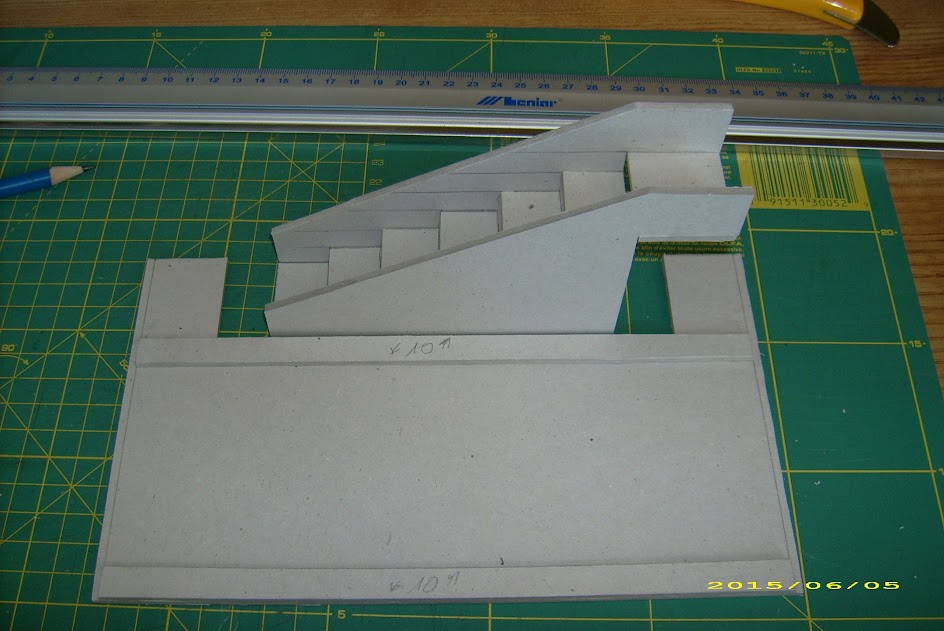
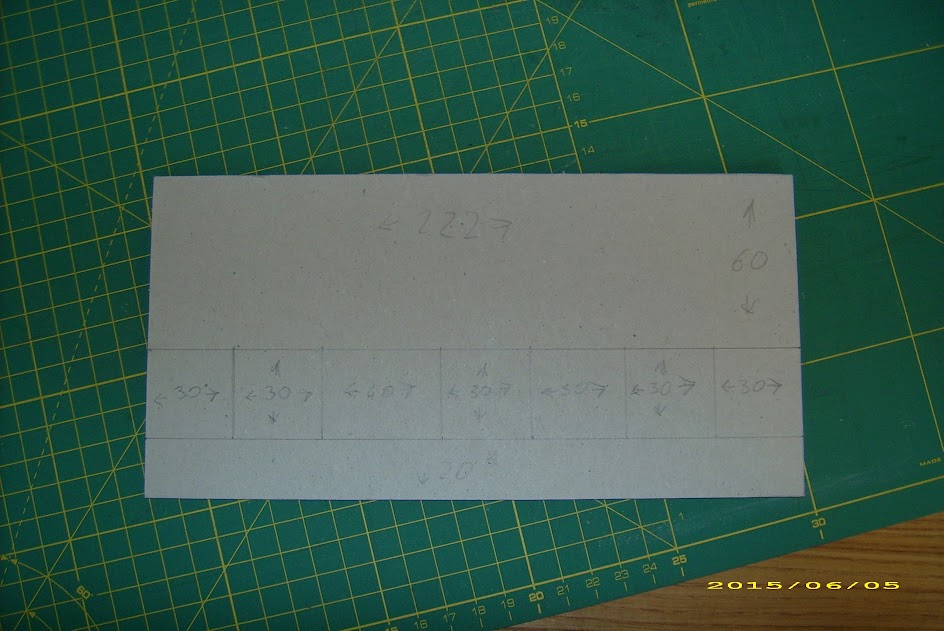
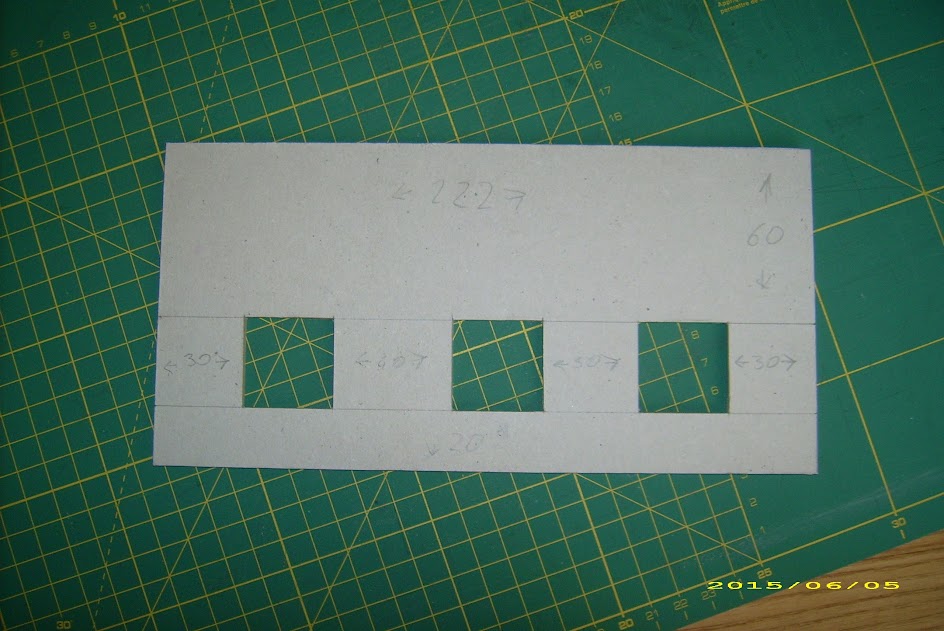
The loft’s wall, with standard-height windows. It slides into the rails.
There’s enough room between the wall and the packed-in buildings so both parts of the loft fit inside (on the other end than the loft in deployed position) for storage.
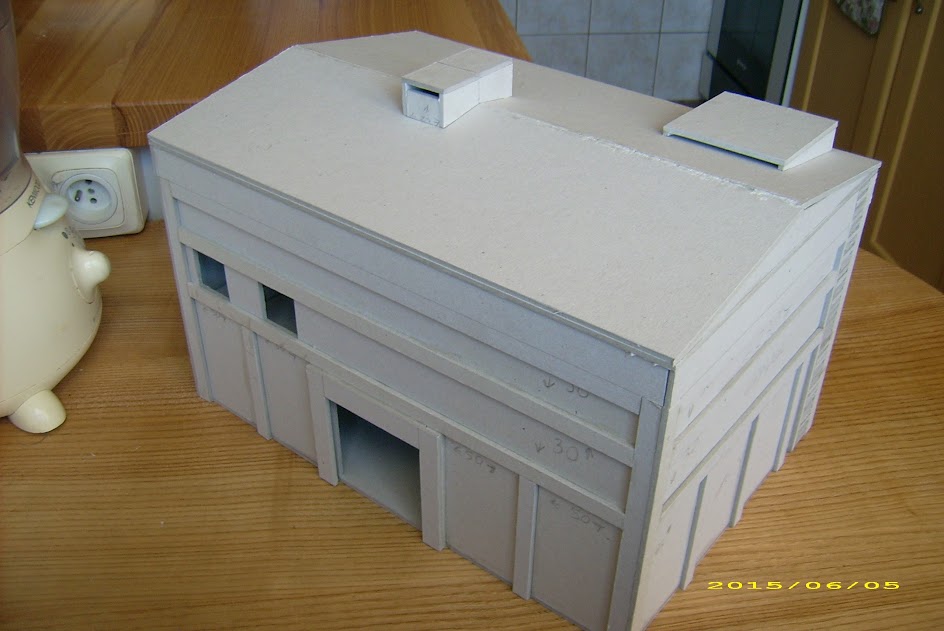
The roof is a pretty simple, double-hinged design, just like those I made in Cardbuilding #4 for the barracks (that’s why I’m not showing them step-by-step). Just scaled up, with a total 20mm of pitch in the middle, and some vent chimneys on the top. Yes, the chimneys are large enough to fit models. But you have to get to them, especially the one on top.

And the last touch – external piece for the cargo gate, allowing to apply an insert with reduced entry size (Wide or Narrow Access… or even no access at all, should you wish so).
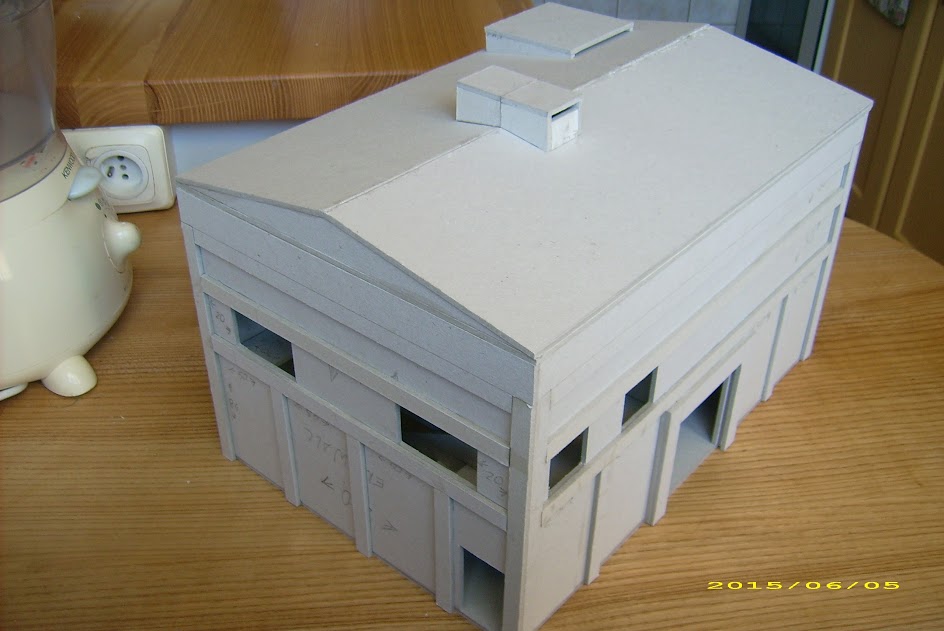
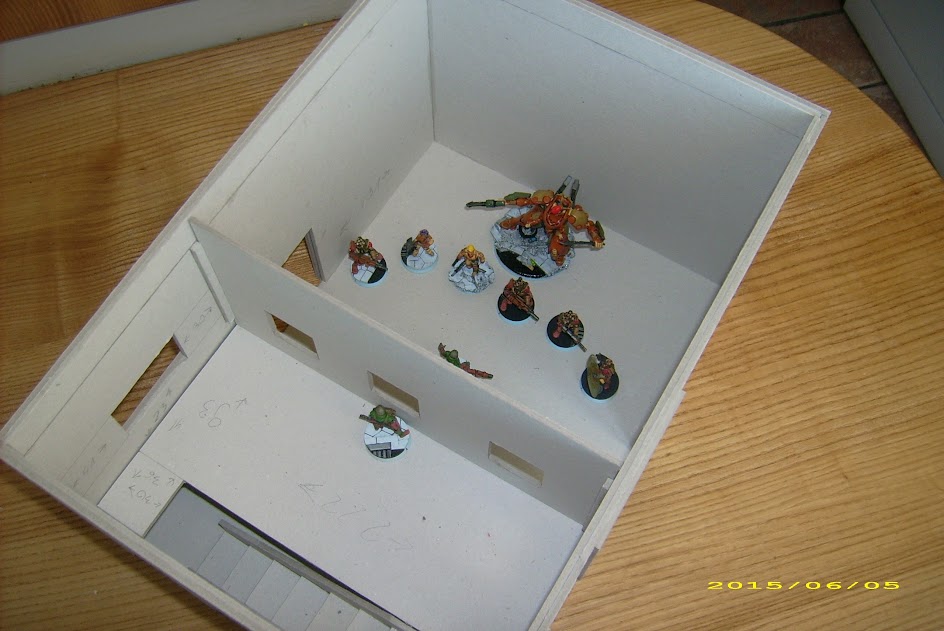
We are done here. Time for some pics:

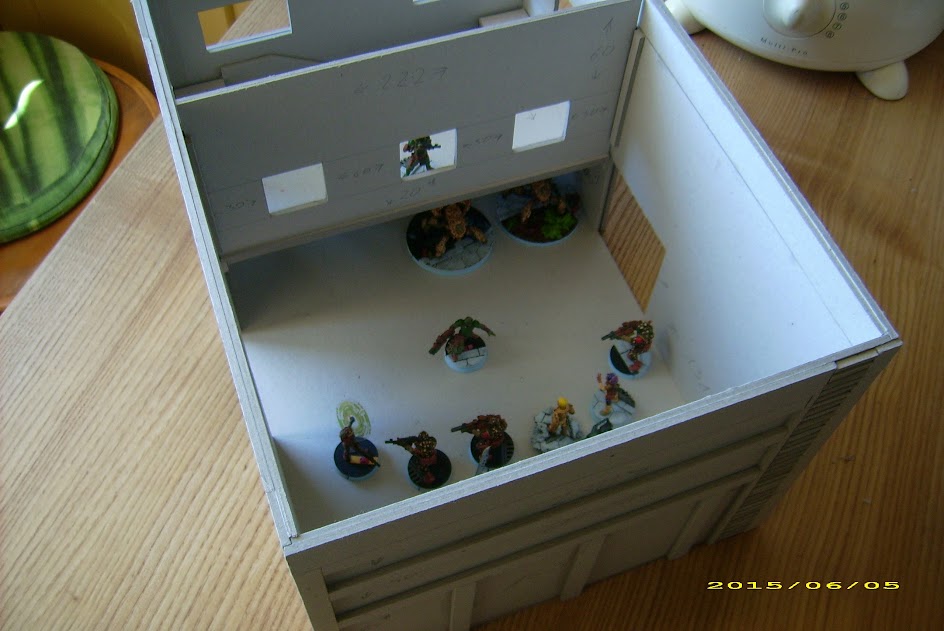
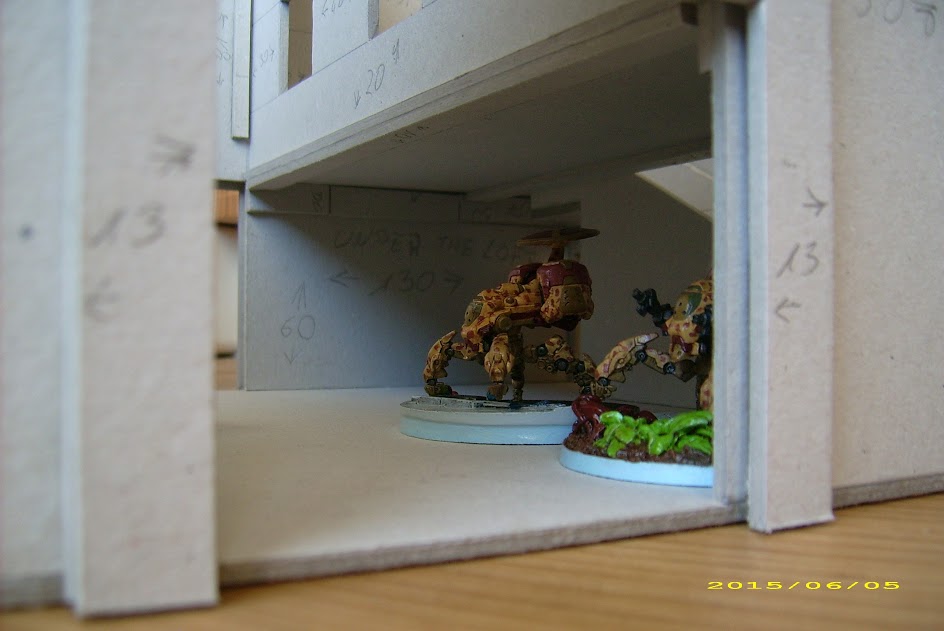
A squad of Sultanate security forces (with some contracted heavy support) take their final briefing before a raid:
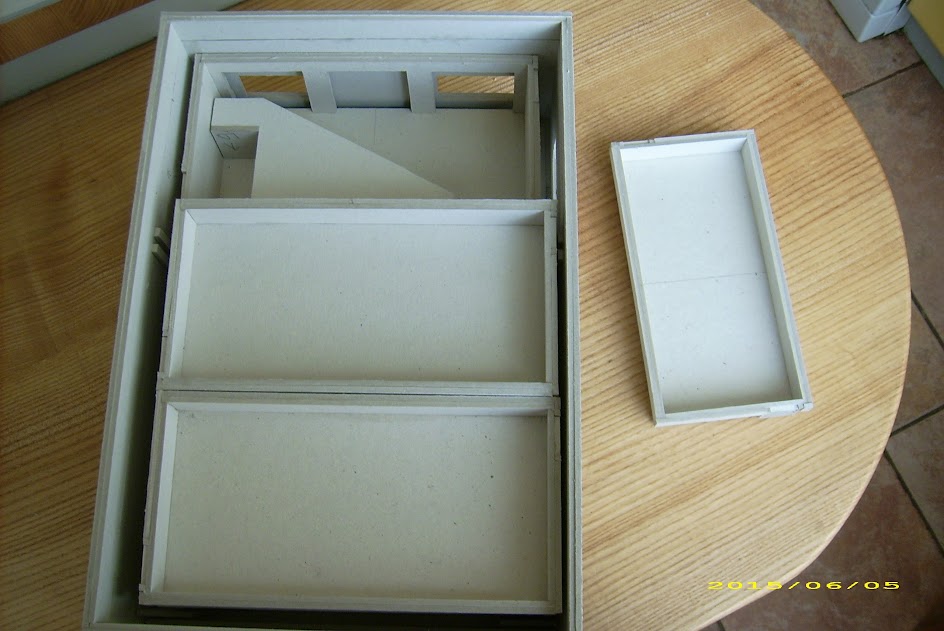
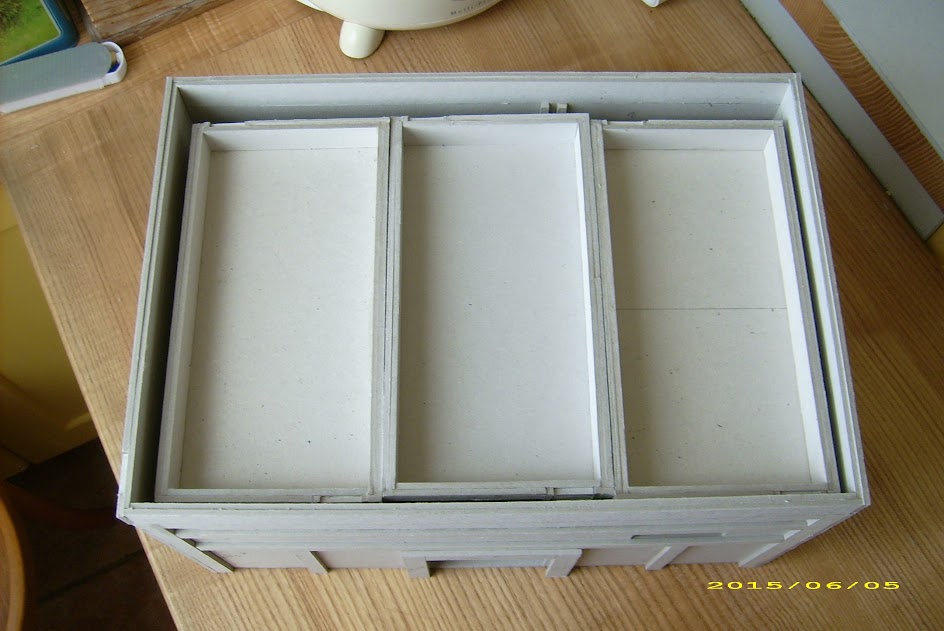
And the warehouse packed full with the smaller buildings:
….stay tuned for Cardbuilding #6. It will be there one day – I decided I need more scatter terrain to fit into these buildings! 😛


So this amazing. Great run down from the perspective of someone starting out. Time to check out 1 through 4.
Your scenery is awesome!
This series has inspired me to build some of my own.
How many sheets of 100×70 would you say it takes to build all the buildings?